Hop Right In!

I believe that salt is to food, what food is to life. In right proportions, it can heighten the taste of what you eat..and in the wrong - destroy! Even the most delicious sweets come added with some salt...to taste!

As for me, I've never enjoyed cooking. And as contrary to my owning a food-blog as it may sound, I always think about daily, routine cooking as a chore. But my tryst with the pots and pans began when I got a kitchen all to myself...I began experimenting and exploring new worlds in my own home. Some outcomes were excellent and some plain disasters. Then sprouted the need to keep track of all those good ones...and hence this blog!

Here, I share those experiments that pleased more than one palate!


Showing posts with label Specials. Show all posts

December 26, 2011

Citrus Golden Sangria

I told'ja I'd see you around New Year's, didn't I? Here I am. For starters, how about we have a rapid-fire round of questions before we close this year's posts? Here we go!

Ever had a sip of a drink and wanted to jump into it and live in there forever? Ever wanted to go all the way and make your own drinks for guests rather than just pick up readily available wines, beer and soda? Ever wanted to quench your thirst with something home-made, yet with the right amount of 'hiccity-hic'? Ever wanted to feel like it is summer when it is bone-chillingly cold outside with some cheery looking drink?

Sangrias are the answer! Inviting hues ranging from blood red, fiery oranges, pretty pinks, golden yellows and clear whites - These are down-right amazingly flexible wine based drinks. And talking about color, let me mention to you that I bring to your party this drink only because of the Free-Spirit Bloggers (pun totally unintentional).

This winter, FSB-ite Mridhubhashini decided to throw more than a snow-ball at all of us. The chirpy young lady gave us a theme fit to liven up any occasion. It being New Year's and all, she made this one really vibrant. She randomly assigned colours of the rainbow to numbers and asked us to pick one each. Next she said, go ahead and make food/drinks which would finally look that colour that we picked. We FSB-ites sure love such games. And, it was my turn to paint it orange!


Many on-board FSB have chosen to make a three course meal using the colour they picked, but I decided to make just a drink, not due to shortage of orange coloured foods, but simply due to shortage of time and some other reasons (which I will fill you in shortly).

And so...yes, Sangria! They're basically wine punches supposed to have originated from Spain and Portugal and have found their way into pitchers across the world. Fresh fruit, wine, sweetener, soda and a hint of brandy if you like, is all it takes. Oh and yes, about a day for all these wonderful flavors to get to know each other well in your refrigerator.

Coming to a wee bit of news from my end - We're moving back to India for good from the US sometime early next year. So this might well be the last post from me for a long while now, unless I sneak in some sit-down-and-write time amidst all the packing that's going on. I'll certainly see you all back, but for now, I'll be taking a break. So, until next time, here's sending you and yours good luck, best wishes and good health in the coming New Year and always.

For now, go ahead and finish that pitcher of Sangria!


December 18, 2011

Classic Red Velvet Cake

Jingle bells, candy canes, cookies and winter,
Lit up homes, decorated trees and warm apple cider!
Santa's on his sleigh, commanding his reindeer,
Would you believe Christmas is already here?


Ok, I get it. I'm no good at poetry. But, here's what is good. I have something lovely to share with you. And, it is, after all the season of giving and sharing. This time around its a classic recipe for a cake that will give you every reason (if you haven't any yet!) to celebrate - Red Velvet Cake.


I had no clue something this divine and delicious even existed until we got to the US. Call me ignorant, but I had my first taste out of a two slice packaged box at my local grocery store, which was baked at the bakery on premises. It was both love at first sight and bite, really. The gorgeous red layers bathed in serene white cream cheese frosting had me swooning.


So, yes, it was a new thing for me. I obviously wanted to try it and I did not want to experiment the first time around. I found  the recipe on a popular baking website because I did not want to mess this up. Not one bit. It turned out great as you can see. 

Did you know that although this cake looks so very red, it even has cocoa in it? And, buttermilk? And vinegar? The cocoa heightens the rich flavor and the buttermilk  renders tenderness. Some believe that the red color comes from the reaction of the vinegar and the buttermilk. But, these days everyone uses food coloring to enhance the red. 


It is said that the Red Velvet is a distant relative of the very famous Devil's Cake. For certain, this one has the colour of his horns all over himself!! Before you start growing a pair of your own out of sheer sinful temptation - Go bake!

October 27, 2011

Diwali Greetings!

It's that time of the year again. Yes, its Diwali season. I now I am about a day late, but hey, Diwali is celebrated for a good 3 days, and beyond in some cases. So, better late than never!


Happy Diwali to all you readers and bloggers out there. May the festival of lights fill you heart with joy, home with warmth and life with prosperity!


So, what did you make for Diwali? Were you asked this? I was umpteen number of times. Well, so I decided why not post something in response. I know most of you would want the recipes of these items. They're on their way. But, for now, drool on!

The simplest of all items I made - Shankarpali


Another easy to pull off sweet-dish. I wonder who ever thought about this one. It will seem like you slogged for hours, but only takes a few minutes - Microwave Dudh Peda


This one is a traditionally made item during Diwali - Karanjia


And, finally, the famous spicy snack - Kodbale


As a custom, we offer these items (called 'Faraal'), fresh fruit and a platter of all items cooked as a part of the days meal, first to God (called 'Naivedhya'). This is done as a part of the 'Puja' or prayers before we eat the same. I took a couple pictures to share with you all, and here they are.

Naivedhya


Faraal


Will share the recipes to all the Diwali snacks and sweets I've put up here, shortly. So, stay tuned and enjoy the celebrations while they last! 

October 25, 2011

Masala Vada

The last few months of every year come strung with festivals knit together one after another. I made these masala vadas for Dussera and we're already well into Diwali! We're all surrounded with lots of good food and festivities. Crunchy munchies and sweet delicacies adorn the counter-top of ever kitchen in an Indian household around this time of the year.

Sorry about the sad quality of the pictures here, it was raining outside and clouds barely allowed any light indoors.

These are not only made during festivals. Think about the number of times you would've stopped by the corner shop to pick up a newspaper cone filled with fresh, hot masala vadas. Yum! This one is an ode to all the delicious street food we have in India.


I have explained making these vadas using a mixer/blender. Traditionally they are stone ground and the resultant texture is simply mouthwatering. This method yields something to that effect.

Make these this Diwali along with your festive spread and watch them disappear. (Psst...Instead, keep a couple of them in the kitchen and away from the grabbing hands. Don't complain if you have nothing left for yourself in the end!)


June 27, 2011

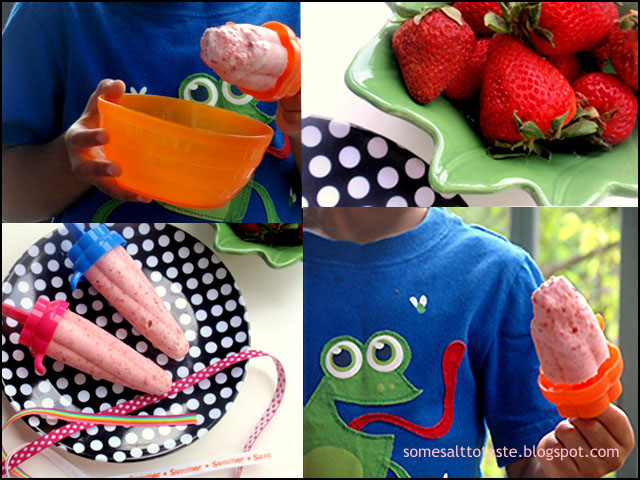
Strawberries and Cream Popsicles

100 posts and 2 years. And, as if that wasn't reason enough to celebrate, I bought myself a Popsicle maker. Pretty obviously, I had to inaugurate it. And, I did. 


May 2010 was when SSTT entered her third year of life. Woot! I never believed I'd come this far with my blog. But, yes I have. Within two years, I've gained a lot more experience in blogging, many more co-blogger friends and certainly learnt so much more in the kitchen. At this moment, I was seriously considering deleting some of my initial posts (my first post being a simple version of Bhel Puri) because they all look so pathetic. Later, it struck me that I'd rather not. It is only when I have those old, badly written, terribly structured and picturized posts (not that I'm very good at pictures even now, but, I'm learning!) that I realize how far I've come in this culinary journey. Of course, thanks to all you readers out there and most certainly to all those of you who go ahead and try the recipes I share with you on SSTT.

Definitely, a little something to celebrate ought to be sweet. With temperatures soaring, all I could think of was a frozen treat. My little sonny enjoyed it to the hilt; I just had to take pictures of him gorging down these strawberries and cream popsicles.


You can even see the little orange bowl in which he loves to keep his munch-ables, whilst eating anything.

March 2, 2011

Oreo Peanut Butter Mousse Dessert

Last weekend's grocery shopping list did not quite include whipping cream, chocolate bars and cream cheese. But, I bought them nevertheless thinking I'll probably make a Black Forest Cake or something on those lines over the coming weekend to serve up as dessert as I've invited my cousin brother and his family over. Of course, with such inviting things sitting in the fridge you could only imagine my desire to whip up something new. I kept thinking about all sorts of desserts and I recollected having heard a chef on TV saying you could make mousse/mousse cakes without eggs by using cream cheese instead. Ah! The many ways that you can make a mousse...so light, yet satisfying! That said, I decided I would experiment with whatever I had on hand. WHATEVER I saw on my kitchen counter-top. And, I saw peanut butter! Now, of course, you could either make a mousse and spoon it into bowls or glasses for it to set before you serve. Pretty much what I did when I made White Chocolate Mousse. But, with this one I decided to take things a wee bit further since this was, of course, an experiment. So, I went ahead and pulled out my box or Oreo cookie to make a base for a dessert-to-be. I worked up my imagination, mixed ingredients and popped it in the fridge for a good 6 hours. The result - YUM!


The only sad thing about this entire experiment was that I made way too less. Boo hoo! I just had about one 3*5 inch layer of this sweet temptation. And, when I said layer, it was just as thick (or should I say thin?) as ONE layer of what you see in the above picture. I wished N number of times that I had churned up more and set it as a thick cake like dessert. Well, well...we'll get there some day. So I cut 1" squares of that one layer that I had, piled it up (in sets of three) and made what I call the Oreo Peanut Butter Mousse Dessert.


And as if this was not already filled with enough calories, I went ahead and made thick chocolate ganache and decorated each piece of dessert. Talk about indulgence!

Oh and guess what? Here's something I got to know from a friend. I had made this on 'National Peanut Butter Lover's Day'. Who knew March 1st was called so, eh? What a superb co-incidence indeed! Now, you need not wait another year to make this one. All you need is a guilt-filled trip to the grocery store just like me. Just this one time, come on. I'm giving you the permission!

October 22, 2010

Quick n Easy White Chocolate Mousse

I am a chocoholic. And, no that's no confession. It's a statement. Almost something that attributes to my personality. So much so that if you know me well enough, you would have no trouble in finding a gift for me if you're feeling overly generous when you drop by my place!

That said, I'd like to make things a little more specific. I am a milk-chocolate chocoholic. No other percentage of cocoa will do. And the absence of it simply fails to turn me on. Just like in the case of white chocolate. But once in a way we do buy these white angels, too. Unfortunately, for them, they do not get gobbled down as quickly as their relatively browner cousin. So...this half a bar of white chocolate sat in my friedge for a good 3 weeks. My eyes kept falling on them but neglecting them until yesterday, as I was browsing through Nigella Lawson's dessert videos on out very own web and something miraculous happened!

She fixed White Chocolate Mousse  out of almost nothing. And, I had just the 'nothing' available on hand. You need not guess what we had for dessert last night!

Nigella used mint to flavour her mousse, while I decided to use pineapple essence and top it off with fresh fruit as you see. And, here is what I see....you drooling like a baby!!!

September 14, 2010

Pineapple Pastry

Did'nt I just make my first Black Forest Cake like a blink ago? Yes, I did. But once it was over, I was almost intoxicated by the rich tastes and memories it left behind...and not to forget, a great learning experience. And since it turned out so good, I was waiting to try my hand the next best pastry I've ever eaten (Oh yeah, chocolate comes first...at all times!) - The Pineapple Pastry. And as if God heard my prayers it happened to be my cousin brother's 15th wedding anniversary just a week after the idea grew in my head. What better excuse does an obsessed baker need?


Making this one is pretty much on the lines of making a Black Forest Cake. Just that you need to interchange all of the Chocolate and Cherry works with everything Pineapple! That said, I am going to get a wee bit lazy and make complete use of the Copy and Paste features that we're all blessed with on our computers, so that I save a little time on typing out all the similar aspects of making these two pastries.


And just because I said I will be copying a good chunk of the procedure from the Black Forest Cake does not mean I wont  guide you at all. I will give you additional information along the way, where required, so stay awake and start reading up this humongous recipe. This is not just drool-able but VERY do-able, too!

August 5, 2010

Black Forest Cake

While baking regular cakes and frosting them for every birthday in the family became a routine, the only stone left unturned was to try and bake the master of all things pastry - Black Forest Cake. Just the three words all by themselves have the power to get anybody into an indulgent mood. That said, this year I decided I would take the plunge and try my hand at baking this divine dessert for my hubby's birthday (psst... and mine, too, which followed!)The last two weeks saw me making frequent trips to the grocery store as I tried to put together all the ingredients needed to make this fabulous cake long before the big day. Besides, since the procedure is a bit long drawn (But it is definitely not difficult! If I can do it so can you!!) I decided to spread the whole baking and decorating process over three days. If you love eating and baking, you will enjoy every single moment of putting together this luxurious cake!

So, two days prior to the birthday, I baked the Chocolate Cake which forms the base of the entire Black Forest Cake. One day ahead, I did the layering and basic assembly of the cake using sugar syrup, cherries and whipped cream. By this time, my cake had trippled in size and it sat the lowest rack in my refrigerator and I kept my fingers crossed that hubby dear would not notice it, since it was enrobed in cream and sort of got camouflaged into the white colour in the fridge. I decided to hit the sack early that night (although excitement of finishing up the cake decoration and all sorts of ideas kept me from falling asleep for a long, long time) and as I walked towards the bedroom I did the most stupid thing I'd have ever done in my whole life. I asked hubby - "Did you open the fridge this evening?". He was like, "Umm..No. But what kind of a question is that?". He obviously thought I was insane. Then I went ahead and said, "Oh why? Can I not ask you anything like that?" Good lord!! What was I talking? He smirked.

I decided that very moment to grab him down to open the fridge. Would you believe that? I showed him the cake that sat shabbily covered in whipped cream. I simply had to do it, lest he ends up dropping something on the cake if he wanted something from the fridge while I was asleep. I had done some random design on it with my star nozzle. Sadly, even after buying everything for the cake, I forgot to pick up piping bags for the frosting of the whipped cream and the damn nozzle kept slipping inside my zip-top plastic bag as I piped. So, I did the worst frosting work ever and ended up making the cake look like a pathetic attempt to decorate a wedding cake (which you see below) and decided to wake up early the next day to really fix things up to make it look perfect. He smiled on seeing the shabby cake and said "Thank you". I was like "Ugh! Guess what cake it is, will you?" (We women never quit, do we?) He goes, "How in God's world would I know....you have bathed the whole thing  in cream!!" That had us all in peels of laughter. So, I told him I would save at least that bit for his surprise the next day. And, on my hubby's birthday I gave the cake its finishing touches and final decoration just before he woke up - all in time for the surprise!!

Here's a pic of the disastrous decoration that sat in my fridge awaiting repair work.....


The next morning I woke up about half an hour early and fixed the decoration. I placed the done-up cake on the counter. The moment he freshened up and came out of the bathroom, I beckoned him into the kitchen to see and guess what sat awaiting him!


"Oh....Black Forest, huh! That looks good!". Was I relieved or what?! Now, so much for having bored you to death with that long story. But, good food is worth long stories, right? Ok. Ok! Here's the recipe!

Oh hang on!!! Before I jump into it, just one last thing. I've split up this recipe for a three layered cake into three steps:

STEP I - Baking the Chocolate Cake Base
STEP II - Layering and Basic Assembly
STEP III - Decorating the Cake to a Finished Product

I feel I've gone back to my Technical Writing profession talking about steps and procedures as write User Manuals all over again! Well well!
So, each of these steps can be done one day at a time. Now, that's easy, is'nt it?

STEP I - Baking the Chocolate Cake Base
This step involves baking a choclate cake which acts as a base to the entire finished product. If you intend to make Chocolate cake anytime, just follow this one and you'll have a moist chocolate cake ready in no time!
Ingredients for the Chocolate Cake (Base of the Black Forest cake)
1 Cup All purpose flour (Maida)
1 Cup Confectioner's Sugar/Powdered Sugar
1 Cup Butter - Unsalted, at room temperature
3 Extra Large Eggs, at room temperature (If you are using small eggs, use 4 nos.)
3/4 tsp Baking powder
3/4 tsp Baking soda
3.5 tbsp Cocoa powder
1 tsp Vanilla essence
1/4 Cup Milk
A pinch of salt

Method
- Preheat oven to 350F and prepare baking dish by smearing oil/butter all over the insides. Dust flour to evenly cover all parts of the dish to prevent the cake from sticking to it once baked
- Cream together butter and sugar and set aside
- In a large bowl, sift together all purpose flour, baking soda, baking powder, salt and cocoa powder. Repeat the sifting process into another large bowl to make sure you have a homogenous mixture of all these dry ingredients
- Now, break eggs into another bowl and beat until fluffy/frothy (about 10-15 minutes) and doubled in quantity
- Pour the beaten eggs into the creamed sugar-butter mixture and beat again until well mixed
- Add the vanilla essense to this wet mixture
- Slowly pour and fold in small quantities of this wet mixture into the dry ingredients using a flat spatula, as you combine it all together to form a smooth batter.
- This batter may be thick, so pour in the milk gradually until such a point where you are easily able to maneuver your spatula in the same and batter is all creamy and dreamy
- Pour the batter into the prepared baking dish (I have used a 9" round dish) and bake for about 30-40 minutes or until a toothpick comes out clean when pierced in the center of the cake
- Once baked transfer the cake onto a cooling rack to allow the cake to come down to room temperature

If you intend continuing to STEP II, make sure the cake is completely cooled. But if you want to go to STEP II the next day, go ahead and place the cooled cake in the refrigerator overnight.

STEP II - Layering and Basic Assembly

This step involves cutting the cake into layers, dousing them in sugar syrup and topping them off with whipped cream and chopped cherries. Sound's easy breezy, does'nt it? Go right ahead and do it!
Take your cake out of the fridge and place it on your contertop until you grab the ingredients required to layer and frost it. This will allow the cake to come back to a warmer temperature before you flip it over your cake board/plate (The one on which you intend cutting it in the end). Now, get hold of all the following things from around your kitchen/pantry.

Ingredients
4 Cups - Whipped Cream/Topping (I used store bought ready-made whipped cream to save me some time. If you intend making it from scratch, go right ahead. Just whip together, in a chilled bowl,  3.5 Cups of heavy whipping cream along with 1/2 Cup (or more if needed) of Confectioner's sugar  until it forms soft peaks)
1 Bottle of Maraschino cherries (without stems) in syrup
3/4 Cup Water
3/4 Cup Granulated Sugar (Regular sugar)

Method
- In a saucepan, combine the water and granulated sugar and set to a boil
- Once the sugar melts, turn off the heat and set aside to cool
- Now, head back to your cake and flip it over your cake board/plate. If you feel the cake is giving you a hard time flipping over (and if you have used a microwave safe dish to bake it) then toss the cake, prior to struggling to get it out of the baking dish, into the microwave for about 15-30 seconds. This will warm up the cake and allow for it to be easily lifted off (by slowly tugging at the sides using a broad off-set spatula) and flipped over onto your cake board. Yet, be careful as you do this so that you dont end up with a broken cake!
- If your cake seems to wobble, turn it back onto original position and smooth away any bulging parts (using the serrated/ridged knife) and flip again onto your cake board so you have a sturdy base to work with. You could place a paper towel below your work area for all the (yummy) mess that follows
- Using a serrated/ridged knife cut the cake into two slices horizontally to form a three layered cake. Remove layers and set aside. Remember in which order and direction you have placed them, lest you end up placing them back in the opposite/wrong way leading to an odd shaped cake after its all done!
- Separate the cherries (I used only 3/4th of a 16oz./1lb bottle) from the syrup. Do NOT discard the syrup. Keep aside in a bowl.
- Chop cherries randomly into small pieces and set aside in another bowl
- (Optional step) Now, take about 5 tbsp of the cherry syrup and mix it with the cooled down sugar syrup to give the cake some extra cherry flavouring.
- At this point you should have one layer (the lowest one for the final cake) on your cake board. If not, place it on the same and mount it on your turn-table (Or put together a make-shift turn-table like I do - I just flip a large steel plate to place the cake, and then I mount this on my round chapati rolling stand. You can see it in one of the images below. Works just perfectly!)
- Lightly drizzle about 1/3rd of the quantity of the sugar syrup (or sugar-cherry syrup if you've included the previous step) over this layer of the cake, covering the entire surface area. This step is what gives the final cake that super moist texture!
- Now, scoop about 1 Cup of the whipped cream and drop the humongous dollop onto the lowest layer using a frosting spatula
- Spread all over the layer covering it completely such that you have a thick layer of whipped cream on it. Add more cream if you think your cream layer is not too thick since this is dependant on what size of a baking dish you used/size of your cake. A 1/2 to 3/4th inch thick layers of cream seem fine to me, but indulge if you like more!
- Now, sprinkle the chopped cherries over this cream layer. Your done-up layer should look similar to the image below

- Place the middle layer on top of this. Smooth out any cream that seems to be seeping out between the layers and place in the fridge for about 20-30 minutes to set
- Pull out and mount the cake back on the turn-table. Repeat spplication of the the sugar/sugar-cherry syrup, topped up with the whipped cream and cherries to this layer and place the top-most/final layer
- To this top-most layer just drizzle the sugar/sugar-cherry syrup
- Now, using the frosting spatula drop about 1/2 to 3/4th cup of whipped cream and frost the entire cake. Your cake should look somewhat similar to the image below


- Don't worry too much if its not a very smooth coating all over since you can fix that in the next step
For now, place this frosted cake in the refrigerator overnight to allow all the flavours to marry, and try to get a good night's rest for the big day: The day you'd finish decorating and cutting and most importantly EATING the cake!

STEP III - Decorating the Cake to a Finished Product
This step involved coating the cake with a smooth layer of whipped cream and topping it up with all that you desire. Yup, yup! We're almost done and I am SO proud that you've read this far. Keep going...your divine dessert awaits you at the end of all this.

Ingredients
Left over whipped cream (You should have about 1.5 Cups left since we used only 2.5 cups before this)
4 oz bar of Semi-sweet Chocolate (I used Hersheys)
2-3 tbsp Chocolate syrup (I used Hersheys, again. I should probably rename this cake to Hersheys Black Forest cake, eh?)
A handful of Maraschino cherries, drained completely (You can use stemmed ones here if you wish)

Method
- Chop the chocolate into slivers/shavings using a sharp, ridged knife and set aside in a bowl/box back in the fridge, so as to avoid melting
- Take small dollops of whipped cream and apply a layer of cream over the sides of the cake as you simultanuously rotate your turntable. Use smooth back and forth motions to cover the entire cake (sides) evenly. Dont worry too much about tiny peaks and valleys. We'll work on them in a few steps.
- Drop about 1/2 Cup of whipped cream on top of the cake and spread out evenly using a flat spatula
- Run your spatula against the top edge to remove any excess cream between the sides and the top of the cake
- Now dip a steel frosting spatula, in hot water, wipe with a towel and spread out any uneven parts of the frosted cake as you rotate the turntable, to get a smooth finished look
- Using a wide spatula, dab on the slivered chocolate on to the sides of the cake. I hope you still have that paper under your turntable. Don't tell me that I did not caution you against this yummy mess!!
- Be careful while doing this so that you dont lose out on the smooth finish of the cake. You can still see some flaws in mine! I really have to work on frosting cakes!!
- Place cherries one inch apart on the edge of the top of the cake
- Now, pipe dollops of whipped cream between each cherry
- Drizzle the chocolate syrup in a zig zag pattern and voila!

WAIT, WAIT, WAIT!!! Pop the cake in your fridge for a couple more hours to set it. Take it out just about 20-30 minutes prior to cake cutting/serving time. I like it that way 'cuz it gets the juices flowing as the cake comes to room temperature. But, if you like it really chilled, go ahead and dig in.


You still here? Ok, nice! Now, cut up a slice of your Black Forest Cake (Ah! finally we get to call it that!) and thank the creator of this world to have given humanity the capability to create something this fabulous. As for me, I am off to sing the popular hindi song - "Tera mujhse hain pehle ka naata koi, yuhin nahi dil lubhata koi" (You share a long-lost bond with me...How else would somebody seem so dear to my heart?!)  to the last slice of my Black Forest Cake!

Makes 12 slices of pure joy!

I'm sending this one to Madhuri's Chocolate Fest  as she celebrates the first anniversary of her blog, Cook-curry Nook.

June 1, 2010

Puran Poli, 2K Visitors And A Thank You Note!!!

Yes, it is celebration time again. This time because SSTT touched 2000 visitors since March 2010. I know there are food blogs out there who have this much traffic in say about a week or so.. but this is big for me. Now, for those of you who have begun to think I made Puran Poli to celebrate 2K visitors I would like to correct you - Nopes! Here's a little story. I wanted to make them for Ugadi/Gudi Paadva but missed making them since we had a simple celebration at home. But the urge to eat puran polis had not died in me - after all we make such delicacies only once in a way! And, just in time for this moment, a friend of mine who is expecting her first baby, asked me if I could make her some. I grabbed the opportunity and made a whole-sale stock of puran polis. And as if all this was'nt enough, I receive this special Thank You note from Sanyukta of Creative Sanyukta. Thank You, gurl! Those of you who have not already seen her blog, take a peek.. she has some really innovative presentations happening there!


I am supposed to pass this to my blogger friends, so here goes!

Madhuri of Cook-curry Nook
Suma of Cakes & More!!
Gulmohar and Nostalgia of Collaborative Curry
Mallika of Veg Bowl
Priya of Priya's Easy and Tasty Recipes
Jothi of Panch Pakwan

And, all of you who continue to drop by SSTT...this one is for you, too. Thank You!!

Now for the recipe of this very popular Maharashtrian sweet treat - Puran Poli!


Ingredients
3 Cups - Maida (All purpose flour)
2 1/2 Cups Toor Dal (Some people use a mixure of toor and channa dals. If doing so, then make sure you soak the channa dal overnight so that it gets cooked well)
1 1/4 Cup Jaggery, made into tiny chunks (You can use jaggery powder to make things easier!)
1/2 tsp Turmeric powder
1/2 tsp Cardamom seeds, powdered
A pinch of salt
Oil
Ghee
Water

Method
- Mix together maida, salt, turmeric
- Pour water and make a soft, pliable dough. Ensure you do not add too much water
- Towards the end of the kneading process add about half a cup of oil and knead using both your hands applying pressure and simultaneously incorporating the oil into the dough. Continue kneading for about 2 to 3 minutes.
- Pour another 4-5 tbsp of oil over the dough
- Cover and set aside for about 2 hours
- Pressure cook the toor dal with just enough water to cover the dal by about 1 inch in the pressure cooker
- Once the pressure has released, drain any excess water and mash the dal to form a soft dough-like texture. It is essential that you have no water content left after you pressure cook the dal so that your stuffing (Puran) turns out super-soft and easy to handle
- In a large non-stick saucepan or a large wok, heat about 2 tsp of oil and transfer the cooked dal
- Add the jaggery chunks/powder and stir for about 20 minutes on a medium-low flame until the jaggery melts and incorporates itself into the dal to form a soft stuffing for your polis
- Stir in the powdered cardamom seeds and continue stirring in order to evaporate any liquid content left over in the stuffing. Turn off the heat as soon as you have a soft dough-like stuffing/puran ready
- Now clear up your counter space and set up your work area with a bowl of oil, a bowl of all purpose flour to dust, your rolling pin and...roll up your sleeves!
- Make lime sized balls of the puran and maida dough
- Using your hands made tiny cup like shapes out of the maida by rotating the dough between your thumbs and fingers (Or you could opt to simply roll them out into a circle using a rolling pin)
- In the center of each 'cup' place a ball of puran, seal as you would a paratha and set aside (like in the picture on the right side). Do not make too many of these at one go since they tend to dry out and you might have difficulty in rolling them out. Make your polis in batches instead
- Once you have about 10 of these ready, on a well oiled surface, roll them like you would chapathis/paratas, only being extra careful so that you do not end up with puran outside the dough. Use smooth, stretching motion to roll these babies, dusting flour along the way
- Place a griddle/tawa on a high flame and when its screaming hot, turn down to medium-low heat
- Place rolled out puran polis on the griddle and cook on both sides using genourous amounts of oil
- Serve hot with ghee and warm milk

Makes about 35 puran polis.

May 12, 2010

Strawberry Lemonade To Celebrate The First Year!

Time flies! Yes, that is probably the most under-rated statment made by everyone at least once in their lifetime..but it is true. I cannot believe it is one year since I started blogging out here on Some Salt To Taste. One year since I decided that I too could provide my two cents to the already brimming-with-talent food blogosphere. So, here is thanking each and every one of you who have been avid readers of all that I put down here...and to those of you who continue to inspire me with your work!

And, this time around I decided that I will celebrate it by sharing with you all a newly discovered summer favourite. We happened to chance on this drink at an American restautant not too long ago...and it is everything the word 'yum' can describe! Soothing and satisfying, perfect for the upcoming hot summer days - Here's presenting the Strawberry Lemonade!

Oh and yes, Cheers to Some Salt To Taste!


This recipe is courtesy Food Network. I did a lot of research online and I found this (One of Emeril Lagasse's recipes on the Food Network's website). He has included sparkling water in his original recipe, which is how I had mine at the restaurant. I made it without the same since I did not have any on hand. Try out both versions and see which suits your taste buds! Either ways its a great drink.

Ingredients
A dozen strawberries, Washed and hulled
Juice of a medium sized lemon (or about 4 tbsp)
2tsp - Lemon zest
4-6 tbsp Sugar (adjust if you need more sweetness)
5 Cups Water
Mint leaves and lemon slices, to garnish

Method
- Set water to boil in a large saucepan
- Once it bubbles, add sugar and allow to boil until the sugar melts
- Add the lemon juice and lemon zest and take off from the heat 
- Allow it to come to room temperature
- Strain into a large pitcher
- Now, puree the strawberries and add this to the completely cooled 'lemony' water and stir
- Place in refrigerator until chill
- When you are ready to serve, fill glasses with ice and pour strawberry lemonade over them. Garnish with mint leaves and a slice of lemon

I made this and stored it in my fridge for about a week. I had a refreshing glass every day! So I would say this makes around 5 to 8 glasses of strawberry lemonade depending on how much ice you add.

Am sending this glass over to Radhika Subramanian's Fun N Sun event. 


Chill. Enjoy!

March 3, 2010

Sunset Slush

I originally wanted to call this one Strawberry Slush on Orange Rocks. But, by the time I assembled it and took this picture, it all began steadily melting and reminded me of a beautiful sunset lending golden hues to the earth. If you are beginning to think I am outta my mind whipping up slushes when the weather-man is still predicting snow... hang tight! I made this for my friend Madhuri who is hosting the 'Serve Me Some....Juices, Shakes, Smoothies' event on her blog. She happens to be located in Bangalore, my hometown, where people are apparently perspiring buckets already - And, summer has just begun! This one is to cool off all my Bengaluru Jana!


And Madhuri, this one is for you too! It's a edible drink - In the sense that you start off eating the icy strawberry slush and as it melts you begin drinking it. How cool is that? And, its simply perfect to end a long, tiring day. Make sure you have someone do the prep work (It's a breeze, trust me) at home after you head off to work to enjoy your cold treat when you return at dusk. Hmmmm...Another good reason to call it the Sunset Slush. Go on and try it.. for this one is no great 'shakes'!

Ingredients
3/4 Cup Orange Juice (You can opt to make fresh juice using fruit. I used Tropicana)
3-4 Fresh Strawberries
1 tsp Sugar (Optional/Replace with honey, if you want sweetness sans the sugar)

Method
- Pour the Orange Juice in a freezer safe dish and freeze
- Blend the strawberries and sugar/honey, with very little water (just enough to cover it in the blender) to a smooth paste/pulp
- Pour this in another freezer safe dish and freeze too
- Every hour just scrape the contents of the strawberry pulp bowl every one hour to make it 'slushy'
- After about 4 hours you should have a pretty frozen slushy strawberry pulp
- When you are ready to drink (or eat!) your slush, assemble as below:
a) Crush the frozen orange juice and place at the bottom of your glass
b) Add some water to make the strawberry pulp tad bit fluid, but not too much, and pour over the orange 'rocks'
c) Dress it up with funky shaped ice cubes and strawberries and your Sunset Slush is ready!!

The above method is a bit long drawn and is applicable if you DO NOT have the Ice Crush option on your blender/mixer. If you do then you can opt to go on adding ice cubes to the strawberry pulp in the mixer for an instant slush. All you will need to do is freeze the orange juice to make things rock!

SERVES 1 (You can actually split it with a friend, too!)

February 22, 2010

A Date with Fondant!

Ever since we got to the US, I have always been hooked to watching Food Network. There hasn't been one passing day where I've not dreamt about cooking this or eating that dish that they make. But above all else, if there is one thing that really caught my attention was the shows that showcased cake decoration. I still continue to remain spell bound by the perfection with which those professionals work. Come November 2009, I was way to infatuated by everything that meant cake decoration since I always LOVE to bake. I had worked with plain old icing before and I wanted to graduate a step further and try my hand at fondant. For weeks, I spent time online researching ways of making it and where I could procure ready-made fondant. I did get lucky soon enough and found out that they sold it at art and craft stores! What an absurd place to sell cake decorating material I thought at first, but later I realized it does take an artsy person to work on it, which explains why its sold there.

I know I should have put up these pictures soon after I made them. But, I was way too busy gorging down good food that the festive/new year's season had to offer! Too many parties and too much good food in a short span of time. I did put up these pictures on Facebook but I'm not sure why they did not find a spot on my very own blog. So, here I do justice to my date(s) with fondant. Better late than never, they say!

The first cake you see is the one I made for Christmas. I'd like to call it 'The Season Of Giving', since X'Mas is all about giving presents and sharing love with kith and kin. It is a French Vanilla cake with a layer of Strawberry Cream and covered with fondant.


Although the box said I can use the fondant for one cake only, I had enough left over to make another one. And since New Year's was around the corner I grabbed the opportunity and baked this as a surprise for my friends who threw a party on New Year's Eve. This one I call - 'Wildflowers to Welcome 2010'!


I cannot wait to get my hands on more fondant (My hubby hates it because our kitchen turns into a bakery with confectioners sugar all over the place when I'm working on fondant cakes and he does not get meals on time since I am so engrossed with this!)....But, I will have to wait a tad bit longer. Boo hoo!

Hmmm, orders anyone?

February 14, 2010

Savory Hearts & Roses

This Valentine's Day I decided to spice things up. Literally! Not because we do not enjoy sinking our teeth into sweet treats, but we had way too much of sugary goodness over the past couple of months. Starting from Diwali until the latest cookie frenzy that struck me over the last couple of days. So, how would you spice up a lovey dovey treat? This time my question was answered by my little sonny boy! He loves a savory crisp snack which we call Khuskhushi in our household that he's been asking me to make for a long time! (I will post that when I make it next). So, I took that recipe and extended it to something...ummm...hearty! Without wasting much more of your precious time, I'll jump straight to the recipe. Oh and before I forget, the amounts of ingredients used here are just enough to make a handful of savory hearts and roses, so if you want more increase all ingredients proportionally.


Ingredients
1/2 Cup All purpose flour (Maida)
1/2 tsp Chilly powder
Red food colour (I've used red icing colour since I did not have this on hand)
Oil
And, of course, some salt to taste!

Method
- Sift the flour
- Add the salt and chilly powder and mix
- Heat about 1 tbsp of oil to the flour and immediately mix. This aids in making the fried hearts/roses crispy
- Now, knead the flour into a dough using a little water (like you would for rotis/chapathis)
- Add the food colouring and knead further until all of the dough is coloured
- Make balls (about 1 inch each) and roll out on a large surface like chapatis
- Using a knife/pizza cutter cut out hearts
- Make roses using steps in this video http://www.youtube.com/watch?v=Uzp3XfhUpQ4
- Heat oil in a wok/kadai. (DO NOT heat the oil to very high temperatures!)
- On a medium-low flame fry each heart/rose quickly and take out over a paper napkin to drain off excess oil
- Serve these spicy hearts and roses with a cuppa garama garam chai

Makes around 8 hearts and 8 roses of small/medium size... Just right for a light snack!


I finally decided to particiapte in a event hosted by food bloggers. Priya, I stumbled upon your blog as I kept browsing. I saw that you have a The Hearts for St. Valentine's Day event and thought I could send this in as an entry. This is my first entry to events. Thanks for hosthing this one, Priya. I do hope you try it too!