Hop Right In!

I believe that salt is to food, what food is to life. In right proportions, it can heighten the taste of what you eat..and in the wrong - destroy! Even the most delicious sweets come added with some salt...to taste!

As for me, I've never enjoyed cooking. And as contrary to my owning a food-blog as it may sound, I always think about daily, routine cooking as a chore. But my tryst with the pots and pans began when I got a kitchen all to myself...I began experimenting and exploring new worlds in my own home. Some outcomes were excellent and some plain disasters. Then sprouted the need to keep track of all those good ones...and hence this blog!

Here, I share those experiments that pleased more than one palate!


Showing posts with label Breakfast. Show all posts

February 15, 2015

Super Moist Banana Nut Loaf

Let's start with a little note before we preheat our oven for this one - Where in the world have I been all this while? Well, to cut things short, I had been to you-seriously-cannot-be-this-lazy kind of a town. Yeah, so let me be brutally honest and agree with you if you think I've become so hopelessly tardy with my food blog. But, I still am trying to revive it and in that attempt I do hope to keep you entertained, engaged and satisfied with whatever little I share every now and then.

Now jumping into the Super Moist Banana Nut Loaf here...
Let me give you some time to jump in.

Done jumping?

This was my first baking adventure after a really, really long break of almost two and half years. And, then I took really, really long to post it, too. Good heavens, I made this sometime in summer and am posting it here in winter. But, well at least I am posting it, after all!

So yes, I made this one day to satisfy my sweet tooth and to serve up to a couple of relatives who dropped by for tea one evening. Ripe bananas come together in the oven with toasted nuts into a delicious, aromatic experience you too can feel, just after one bite into this loaf!

August 16, 2011

Rava Dosa with Pudina Chutney | Savory Semolina Pancakes with Mint Chutney

Let's talk about the best days of the week. Yes, you guessed it right! Weekends are always about relaxing. And, heralding every weekend is a hearty breakfast that follows a late night of Friday fun with friends and family or all by yourself watching a flick - Your pick! But, wait a minute! Did I just hear you say - "What do I make for breakfast?". And, you dare not answer yourself with something as mundane as cereal with milk, or worse a store-bought slice of bread or a bagel thrown under a dollop of self-proclaimed low-fat, imitation butter. 

Of course, all these are quick fix breakfast solutions for on-the-run weekdays. In fact, I  myself gorge these down as if the world is coming to a close every morning. But, what if one day the cereal and bread aisles in the supermarket vanished. Zap!


Ok, let's not make it sound that bad. But here's what - I always make sure I make something elaborate for breakfast on weekends imagining there's no bread. Oh and yes, no frozen breakfasts, too! That way you are not only satisfying your taste-buds with some fresh, home-made food but can also go light on lunch and dinner. Isn't that just what more researchers say? See, I wasn't wrong anyway. Ok, ok. So much for my justification. But, here's my point - Make Rava dosa with pudina chutney. I can see you salivating. Go grab the ingredients. Even if its not the weekend, just go!


March 22, 2011

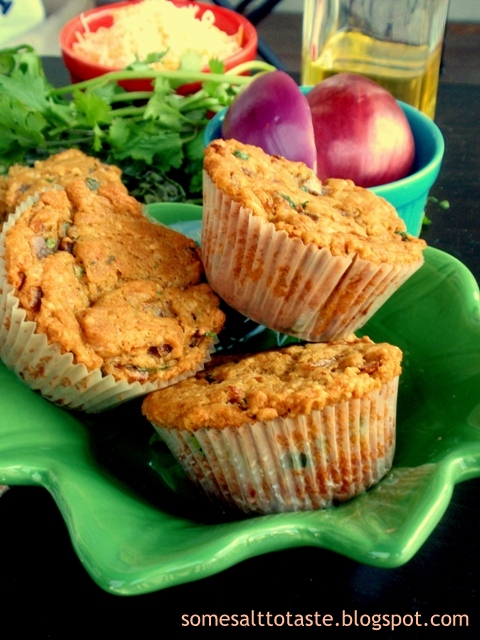
Desi Style Savory Whole Wheat Onion Cheddar Muffins

Another one of my original baking experiments that turned out great and ....I can already see the faces light up! I know I've bored you savory food lovers enough with all my cakes and sweet muffins. So, this time I've given you mirch-masala people something to drool about - and, that too, from the oven! Literally killed two birds in one shot here.


To make things better, I've added Indian spices to give these muffins a desi feel without losing out on the wonderful combination of onion and cheddar cheese.


Do you need more reason to try this one? Ok, here's one. Having this bake in your oven makes your home smell like you've made freshly baked bread. Not heard of anyone who loathes this one, eh?

February 25, 2011

Sugar Glazed Banana Walnut Muffins

I hate to waste food. It is of course not something anybody would like doing. Especially when it comes to fruit, I hate to see myself throw away rotten fruit when I know I could have eaten it in the raw - What more can a lazy person ask for? No cutting, no chopping. Just wash and eat. Well, so much for natures such gifts, we always end up in situations where we have foods reaching the peak of their flavour and sometimes we just don't know what to do with the same. This happens most of the time, in our house, with bananas. We eat a couple, then they go over-ripe and then into the garbage pail. But, this slowly changed ever since I discovered the recipe for Banana Bread over a couple years ago. Not that I'd bake this every time we had over-ripe bananas, but its just such a wonderful way to use up fruit than to throw it away.


This time around I decided to twist the Banana Bread recipe to the muffin version. I even decided on adding walnuts since they perfectly compliment banana muffins. And, of course I topped it all off with a sugar glaze. One bite into this fella and you know you ain't sharing him with anybody!

July 20, 2010

Super-soft Low-fat Eggless Whole Wheat Carrot Muffins

Over time, baking (to me) has become both an obsession and therapy. I bake when I am happy. I bake when I am sad. And, sometimes (almost all the time, really) there needs to be no excuse for me to bake. Just the joy of having the wafts of something miraculous happening in my oven gives me a high that I would think no drink could! But, this time around I did have an excuse to bake. I bought a new muffin pan (and why do I feel like a kid confessing he/she secretly bought a new toy? Haha!). Just as you guessed, it did not end at that. I had to use it the very same day...and that's exactly what I did.

Posted by Picasa
These muffins to me are very special. (Bahahaha! I know you're like say something new..who does'nt like muffins?!) Well, I have a solid reason this time around. I've always wanted to master baking. I know I am still thousands of miles away from it, but I sure want to get there - and what a delicious run it is indeed! After I started blogging and associating with so many people who really push the limits to how much you can do, my food-adventurous-side really got all fired up! Everytime I baked (until yesterday), I would take a look at some recipe online at least to make sure I knew my measurements right. But, these muffins happen to be my very FIRST experiment with baking where I have not taken a single peek at anything - online or otherwise. I had my heart in my hand as the oven did its work, and boy, was I happy at the end of it all!!


Now, with all that said, I would be a really stupid person if I do not give credit to Madhuri for having introduced me to just how delicious baked goods can be without eggs. Thanks babe! In this recipe, I've used flax seeds to replace eggs. I still remember discussing the goodness of these seeds with another friend of mine who suggested I could even add them to making chapathis etc. My instant response was, "Chapathis? No WAY! I do not want to waste them like that when you can bake with them!" *devilish grin*. And if you've been an avid follower of SSTT you'd have noticed the Microwave Chocolate Cake (Thanks to Madhuri, all over again!) I had mentioned that I was going to experiment on it. I did just that. I traded the all-purpose flour for whole wheat to keep things as healthy as I could. Also, this time I did not use the microwave and the results with the regular oven, as you can see, were fantastic, too!


I bought the muffin pan yesterday, baked these yesterday, clicked the pics today and posted it out here too! That should tell you just how excited I am about baking. LOL! Okay, let me stop jabbering and give you the recipe, NOW!

Ingredients

3/4 cup Whole Wheat flour
3/4 cup brown sugar (tightly packed)
A pinch of Salt
3/4 tsp baking powder
1/4 tsp baking soda
1 tsp Vanilla extract
3 tsp roasted and fine-ground flax seeds mixed in 1/2 cup warm water (Or two eggs. If you opt to use eggs increase the quantity of the whole wheat flour by a fourth of a cup i.e. 1 cup)
Between 1/3 - 1/2 cup Whole Milk
Between 1/3 - 1/2 cup Cooking Oil (I've used Sunflower)
1/2 Cup grated carrots

Method
- Preheat oven to 350F
- Spray/Oil muffin pan and set aside
- Sift the whole wheat flour into a large bowl
- Add brown sugar, salt, baking powder and baking soda and stir well
- Toss in the vanilla extract, oil and whole milk and mix well. This batter will be very thick
- Now, give a slight stir to the flax seeds in the warm water and add them to this batter
- Add grated carrots
- Whisk for about 5 minutes
- Line prepared muffin pan with paper baking cups and pour batter into each, upto about 3/4th of the cup. (I have used a pan that has a 1 3/4 inch (4.5cm) base diameter)
- Bake for about 30 minutes or until a toothpick comes off clean out of the center of a muffin
- Cool completely and serve

Makes 12 'I-want-one-NOW' muffins.

Go ahead and bake them in dozens...then stock 'em up in your fridge. Warm them up for a couple seconds in the morning and you will no excuse to skip breakfast ever again!

May 5, 2010

Mixed Vegetable Paratha

I would be lying if I said I make these often and that I am a pro at it. Honestly, I hardly make stuffed parathas of any kind although I love eating them. So, every now and then when I have the mood for it (psst... when I dont want to make many dishes for dinner!) I end up making these savoury, healthy flat-breads on which we feast! Yes, the picture below does little justice...but I really did not know how else to click it. Besides, I was way too eager to eat them screaming-hot-outta-the-griddle alongside Sanjeev Kapoor's Chatak Chillie pickle which finds its spot on my plate at almost every meal.

Ingredients
2 Cups Whole wheat flour
1 Medium sized potato, washed and peeled (This helps with the binding of the stuffing)
1.5 Cup of mixed veggies, washed, cleaned/peeled and roughly chopped (I've used peas, cauliflower, carrots and green beans)
1/3 Cup Onion, finely chopped
2 tbsp Ginger-garlic paste
2 Green chillies, finely chopped
1 tsp Jeera (Cumin seeds)
Oil
Water
And, of course, some salt to taste!

Method
- Knead the whole wheat flour into a soft, pliable dough using water
- Once all the flour holds together as one, add about 1/3rd cup of oil and knead well for about 3 minutes to ensure that the dough is soft and easy to roll out
- Cover and set aside
- Boil all the veggies (potato included) in the pressure cooker (or microwave) with some salt and minimum water
- Drain any excess water and mash the vegetables to make a soft textured paste. This is easy only if you have no water content left from boiling the vegetables
- Heat about 1 tsp oil in a wok/kadai and add jeera
- Once it splutters add the finely chopped green chillies, ginger-garlic paste and onions and fry for about a minute
- Now add the boiled and mashed vegetables
- Adjust salt and stir until any left-over water/moisture evaporates, but the mixture still retains a soft texture
- Set up your work area with your rolling board, rolling pin, a wide bowl of whole wheat flour for dusting while you roll
- Make lime sized balls of the vegetable filling and set aside
- Wash hands and now make slightly larger than lime sized balls of the dough
- Roll out the dough using the flour to dust your rolling board (so as to avoid sticking) into about a 2.5 to 3 inch wide circle
- Place the vegetable filling in the center and cover it from all sides and seal from above
- Press slightly to ensure a tight seal. Meanwhile place your griddle/tawa on the stove on a medium flame so that it heats up
- Now douse this in whole wheat flour and dust your rolling board with more flour
- Roll out to make parathas to your desired thickness. Make sure you use smooth, 'spreading' motions as you roll so that you dont end up with torn parathas
- Toss vegetable parathas on the hot griddle/tawa
- Apply oil and fry on either side until cooked through
- Serve hot with pickles and yogurt

SERVES 3-4 (Makes about 10-12 parathas)

March 19, 2010

Neer Dose and Vegetable Saagu

Making dosas was once a very skillful task for me. Soaking various dals and rice in the right proportions. Then, grinding it to a fine mixture and then allowing the concoction to ferment to the right level. And as the grand finale, pouring the perfect dosa on the griddle - All seemed like a humongous task. Not that I am an expert now, but I have learnt the simple tricks of the trade to end up with some lip-smacking ones. In fact, it has been only about two years now since I have started making idli and dosa batter at home. Among the umpteen number of dosa recipes I have seen/eaten I think my personal favourite is the Neer Dosa, which if I am not wrong is an authentic Mangalorean dish. Back in India, I had a friend from Mangalore who lived in the same apartment building as us, where I used to eat this dosa very often. It pairs amazingly well with non-vegetarian and vegetarian gravies alike. I had almost forgotten this childhood favourite of mine...but Madhuri posted a different version of the same on her blog, which refreshed my memory. In this post, I've whipped up vegetable saagu that is normally served along with puris in South Indian hotels as the famous Puri-Saagu combo. The crispy yet soft, melt-in-your-mouth texture of the Neer Dosa beautifully compliments the entire experience of eating this side dish.

Posted by Picasa


Ingredients for Neer Doses
1 Cup Rice, soaked for one hour (I have used Soona Masoori. You can even use Basmati)
2 tbsp. grated coconut
A pinch of baking soda
Water
And, of course, some salt to taste!

Method
- Grind all the ingredients to a smooth paste in the blender/mixer
- Add about 2 glasses (16oz) more water to the ground paste to make the batter watery
- On a hot griddle/tawa, first sprinkle water to cool off temporarily
- Once the water evaoprated, on a high flame, spread oil and pour the batter in a sprinkling action to form a complete circle
- Turn the flame to medium, hold on to your patience and wait for the dosa to cook. It will slowly form the net a net-like texture and come off from the sides indicating that it has cooked on the lower side
- Flip and fry the other side
- For every subsequent dosa, repeat by cooling off the griddle/tawa by sprinkling water and then spreading oil before you pour (sprinkle) the dosas
- Serve hot with vegetable saagu or any spicy gravy/chutney


Now that we've mastered the Neer Dose, let's discover the Vegetable Saagu recipe.


Ingredients for Vegetable Saagu
For the Masala
1/2 Cup Coconut (I used frozen coconut slices)
1/2 Cup Channa Dalia (Phutane)
2 Green chillies
2 tbsp Ginger-garlic paste (You can substitute for fresh grated ginger and garlic)
3/4 Cup Coriander/Parsley
1 tsp Jeera

For the Gravy
2 Cups choice of vegetables - Boiled (I have used potatoes, carrots, green beans and peas)
1 Cup Tomato - Finely chopped
1 Cup Onion - Finely chopped
2 tsp Tamarind pulp
1 tsp Mustard seeds
1/2 tsp Asafoetida/Hing
6-8 Curry leaves
Oil
And, of course, some salt to taste!

Method
- Grind all the Masala ingredients to a smooth paste
- In a deep saucepan, heat oil
- Add mustard seeds and allow to splutter
- Toss in the asafoetida and the curry leaves and stir a few seconds
- Add the onions and fry until translucent
- Add the chopped tomatoes and stir until done
- Pour the ground masala and stir well
- Cook for about a minute, stirring occasionally
- Add the chopped vegetables (along with the water in which you boiled it to retain the goodness) and salt and cook another 3 minutes (keep an eye and stir, as it may boil and fly all over your stove)
- Pour the tamarind pulp and simmer for about a minute
- Stir again and if needed, add water to adjust the consistency of the saagu if it is to thick (It should not be too runny, too)
- Garnish with fresh coriander sprigs and serve hot

SERVES 4 (Makes a good 15-20 dosas. You can comfortably tuck in about 4 dosas for breakfast!)

February 11, 2010

Chole Bhature

I had clicked this picture a long time ago, but I never got the mood to sit down and type the recipe (Why? It's long!) for this absolutely delicious Punjabi preparation. Today, as I skimmed through my collection of photographs I thought, why not give this little guy his piece of space on my blog. I would not want to call this comfort food, because it can get way too comfortable and you might end up stashing on extra calories making this too often! Most people have their own versions of preparing Chole. Some even claim that adding a tea bag to the cooking process of the Channa adds more flavour. But, in this recipe, I've kept things just as simple as I could and the outcome was still very satisfying. I gorged down three Bhaturas myself....and not to forget, pigged out on left-over Chole the next day. So, try this one and let me know!
Posted by Picasa

Ingredients for Bhature
2 Cups All purpose flour (You could replace half of it with whole wheat like I normally do to feel less sinful!)
1/2 Cup Yogurt, beaten
1/4 tsp Sugar
A pinch of Baking powder
Oil (For kneading and frying)
A napkin (either a large paper towel or a cotton one will suffice)
And, of course, some salt to taste!

Method to prepare Bhatura
- In a large mixing bowl, toss in the flour, sugar, salt and yogurt and knead
- Use oil generously to knead further into a soft dough
- Wet the napkin and cover the dough for about 2 hours or until it rises a bit. If you use wheat the amount that it rises is not too much, so do not worry!
- Heat oil in a large wok
- Make balls about 1 to 1.5 inches in diameter and roll out like you would rotis/chapathis, but do not make it too thin
- Deep fry in hot oil

Ingredients for Chole
1.5 Cup - Whole Channa, washed and soaked 8-10hrs or overnight (The quantity more than doubles after soaking)
1.5 Cup Onions - Finely Chopped
2 Cups Tomatoes - Finely Chopped (You can use puree too)
2 tsp Chilly powder
2 tbsp Coriander powder
1 Cup Yogurt
2 Green chillies
2 Sprigs of fresh coriander
2 tsp Garam Masala powder
2 tbsp Ginger Garlic paste
1 tsp Cumin seeds
2 tsp Turmeric powder
Oil
And, of course, some salt to taste!

Method to prepare Chole
- In a pressure cooker, cook the channa along with the water its been soaked in with salt. Set aside.Make sure the channa is very well cooked and breaks on touching. This takes a good number of hoots!!
- Blend together the green chillies, coriander, tomatoes and yogurt and set aside
- In a deep saucepan, heat oil and add Cumin seeds
- Once they splutter add the chopped onions and fry until transparent
- Add the ginger garlic paste and stir
- Toss in tomato mixture that you just blended
- Add the coriander powder, chilly powder, garam masala and turmeric and stir until the entire concoction is well cooked
- If you find that the water content is too less you can add the water in which the channa was cooked. This gives the dish more flavour
- Cover and simmer for 2 minutes
- Now, add the cooked channa and stir well
- Adjust spices and salt to your taste
- Cover and simmer for about 20 minutes (Longer the better but take care of the liquid content. Slow cooking has its benefits really)
- Serve hot with freshly made bhature, lemon wedges, green chillies and chopped onions

SERVES 5 (about 2-3 bhaturas per person)

February 2, 2010

Idli (Idli Batter)

I have two methods of preparing Idli Batter. One uses Idli rava and the other comprises rice. You can opt either one of them to make idli batter.

Ingredients
1 cup - Urad Dal
2.5 cups - Idli Rava ( you get this in Indian stores) OR Rice
1 handful - Poha (flattened rice)
Salt, to taste
A pinch of baking powder/soda

Method (using Idli Rava)
1. Soak urad dal and poha overnight/8hours.
2. Drain excess water and grind into a smooth, thick mixture.
3. Add the Idli Rava and mix. This will make the better very dry and hard to mix. So pour in some water. Not too much, but just enough to make it like a batter. Remember this batter HAS to be thick (Thicker than dosa batter consistency)
4. Add salt and soda.
5. Leave to ferment. This takes about 6-8 hours.
6. Stir the fermented batter to remove any air bubbles. (Well fermented batter will have lots of air bubbles and would have risen up in the vessel)
7. Promptly refrigerate.
8. When required, grease idli mould stand and pour batter. Steam in pressure cooker and serve hot with any chutney of your choice.

Method (using Rice)
1. Soak urad dal, rice and poha overnight/8hours.
2. Drain excess water and grind into a smooth, thick mixture.
3. Add salt and soda.
4. Leave to ferment. This takes about 6-8 hours.
5. Stir the fermented batter to remove any air bubbles. (Well fermented batter will have lots of air bubbles and would have risen up in the vessel)
6. Promptly refrigerate.
7. When required, grease idli mould stand and pour batter. Steam in pressure cooker and serve hot with any chutney of your choice.

This batter keeps for about a week in pleasant weather conditions in the refrigerator.

Fermenting Tips
a) If the weather is cold (below 10C) then I suggest that you turn on the oven for a while to about 250F and preheat. Then Turn Off once its hot. Now, toss the vessel of mixed batter into it with a plate/bowl under it, in case the batter overflows after fermenting.
b) If the weather is warm/pleasant (between 10C to about 20C) you can just place it on your stove, right on top of the part where the flame of the burners are lit. That warmth will be enough for fermentation.
c) If the weather is hot don't do any of the above. The heat in the air will ferment the batter in no time.

Dosa (Dosa Batter)

Ingredients
1 cup - Urad Dal
3 cups - Rice ( you can use either boiled rice or regular rice. I use regular rice. You can also use the rice that mentions Idli Dosa Rice in Indian Stores here.)
1 handful - Poha (flattened rice)
1.5 tsp - Methi seeds
3 tbsp - Toor Dal
3 tbsp - Channa Dal
A pinch of baking soda
And, of course, some salt to taste!

Method
1. Simply mix and soak all these ingredients with sufficient water (since the dals absorb water add enough water. One and half to two times the amount of the mixed ingredients should be good) for about 8 hours/overnight. You need not wash the mixture
2. After 8-10 hours, drain excess water
3. Grind in a blender/mixer until it becomes very smooth in texture. Do not add too much water. Maintain a thick batter like consistency as you grind it
5. Pour the batter in a vessel and add salt, to taste. Make sure you use a large vessel to allow the batter to rise
6. Add the soda
7. Leave to ferment. This takes about 6-8 hours.
8. Stir the fermented batter to remove any air bubbles. (Well fermented batter will have lots of air bubbles and would have risen up in the vessel)
9. Promptly refrigerate.
10. When required, make dosas by pouring the batter using a deep, round ladle on a hot griddle (previously sprinkled with oil) just like you would pancakes. Enjoy with chutney/alu sabji

This batter keeps for about a week in pleasant weather conditions in the refrigerator.

Fermenting Tips
a) If the weather is cold (below 10C) then I suggest that you turn on the oven for a while to about 250F and preheat. Then Turn Off once its hot. Now, toss the vessel of mixed batter into it with a plate/bowl under it, in case the batter overflows after fermenting.
b) If the weather is warm/pleasant (between 10C to about 20C) you can just place it on your stove, right on top of the part where the flame of the burners are lit. That warmth will be enough for fermentation.
c) If the weather is hot don't do any of the above. The heat in the air will ferment the batter in no time.

Toor Dal Chutney

For those of you totally bored with the good old coriander chutney, here is a refreshing new way to look at the traditional Indian dip. You fry up some lentils until they are smokey, grind them with some spices and voila - You are all set to gorge it down.


Ingredients
1/2 Cup Toor Dal
2 tbsp Coconut (I've used frozen slices)
3 cloves of Garlic
2 Red Chillies (adjust according to your desired heat quotient!)
1/4 Cup Onions - Cubed/Sliced
2 tsp Tamarind Pulp
A sprig of Coriander
And, of course, some salt to taste!

Method
- Place a wok on your burner under a low-medium flame.
- Once it warm, toss in the toor dal and fry until fragrant
- Now add garlic and fry
- Add the coconut, red chillies and onions and fry until they all give out a warm smokey aroma (You can increase a flame a tad bit, but keep an eye so that you don't end up burning it since each ingredient roasts at a different temperature)
- Once roasted, set aside to cool
- Toss the roasted ingredients in a mixer/blender and add the tamarind pulp, coriander and salt
- Use minimum water and grind into a fine paste.
- Serve with freshly prepared idlies.

SERVES 2