Hop Right In!

I believe that salt is to food, what food is to life. In right proportions, it can heighten the taste of what you eat..and in the wrong - destroy! Even the most delicious sweets come added with some salt...to taste!

As for me, I've never enjoyed cooking. And as contrary to my owning a food-blog as it may sound, I always think about daily, routine cooking as a chore. But my tryst with the pots and pans began when I got a kitchen all to myself...I began experimenting and exploring new worlds in my own home. Some outcomes were excellent and some plain disasters. Then sprouted the need to keep track of all those good ones...and hence this blog!

Here, I share those experiments that pleased more than one palate!


Showing posts with label Bakes. Show all posts

February 15, 2015

Super Moist Banana Nut Loaf

Let's start with a little note before we preheat our oven for this one - Where in the world have I been all this while? Well, to cut things short, I had been to you-seriously-cannot-be-this-lazy kind of a town. Yeah, so let me be brutally honest and agree with you if you think I've become so hopelessly tardy with my food blog. But, I still am trying to revive it and in that attempt I do hope to keep you entertained, engaged and satisfied with whatever little I share every now and then.

Now jumping into the Super Moist Banana Nut Loaf here...
Let me give you some time to jump in.

Done jumping?

This was my first baking adventure after a really, really long break of almost two and half years. And, then I took really, really long to post it, too. Good heavens, I made this sometime in summer and am posting it here in winter. But, well at least I am posting it, after all!

So yes, I made this one day to satisfy my sweet tooth and to serve up to a couple of relatives who dropped by for tea one evening. Ripe bananas come together in the oven with toasted nuts into a delicious, aromatic experience you too can feel, just after one bite into this loaf!

December 18, 2011

Classic Red Velvet Cake

Jingle bells, candy canes, cookies and winter,
Lit up homes, decorated trees and warm apple cider!
Santa's on his sleigh, commanding his reindeer,
Would you believe Christmas is already here?


Ok, I get it. I'm no good at poetry. But, here's what is good. I have something lovely to share with you. And, it is, after all the season of giving and sharing. This time around its a classic recipe for a cake that will give you every reason (if you haven't any yet!) to celebrate - Red Velvet Cake.


I had no clue something this divine and delicious even existed until we got to the US. Call me ignorant, but I had my first taste out of a two slice packaged box at my local grocery store, which was baked at the bakery on premises. It was both love at first sight and bite, really. The gorgeous red layers bathed in serene white cream cheese frosting had me swooning.


So, yes, it was a new thing for me. I obviously wanted to try it and I did not want to experiment the first time around. I found  the recipe on a popular baking website because I did not want to mess this up. Not one bit. It turned out great as you can see. 

Did you know that although this cake looks so very red, it even has cocoa in it? And, buttermilk? And vinegar? The cocoa heightens the rich flavor and the buttermilk  renders tenderness. Some believe that the red color comes from the reaction of the vinegar and the buttermilk. But, these days everyone uses food coloring to enhance the red. 


It is said that the Red Velvet is a distant relative of the very famous Devil's Cake. For certain, this one has the colour of his horns all over himself!! Before you start growing a pair of your own out of sheer sinful temptation - Go bake!

November 21, 2011

Cupcake Mania | Buttercream Frosting Recipe and Icing 101

There's really nothing much to be said on this post. I made this for a couple of close friends when we all met up at a new vacation home in the Poconos, that one of them had bought.

It was celebration time, so cupcakes were the perfect answer.


I baked over 3 dozen egg-less cupcakes. One batch of plain vanilla, one of vanilla with chocolate chips and one of good ol' chocolate. I then made blue, white and brown buttercream frosting and decorated them.


Here's the super simple recipe to the best and most popular frosting on this planet!

Buttercream Frosting Recipe


Ingredients
1 Cup Unsalted Butter/Vegetable Shortening, at room temperature
4 Cups Confectioner's Sugar, sifted
1 tsp. Vanilla Essence (Or any other flavour that you want to use, like almond, pineapple etc.)
2 - 4 tbsp milk (Or more depending on the consistency of icing you want in the end)

Other
Icing Colours (optional; as desired)
Electric Hand Mixer (Using a whisk would just take you much, much longer)

Icing Notes

1. Using Vegetable Shortening in place of butter will ensure you have pure white buttercream frosting

2. In order to make dark brown/chocolate colored frosting you will need to substitute one cup of sugar with cocoa powder. If it turns out too thin, add more sugar since sugar stiffens icing.

Method
- Place vegetable shortening/ unsalted butter and vanilla essence in a large bowl
- Add sugar about half cup at a time and mix using the hand mixer/whisk until all the sugar is well blended
- Add milk, one teaspoonful at a time to thin the icing to desired texture and mix well
- At this point the buttercream frosting is ready and you can colour it with desired icing colours

Icing Texture Guide
a) Very Stiff/Minimal Milk usage -This type of icing takes effort to spread because of its extreme thickness. It is best for icing flowers and decorations that need to hold their shape
b) Medium Consistency - This type of icing spreads when pressure is applied but still holds shape. It is best for cake borders and icing patterns
c) Thin Consistency - This type of icing spreads very easily and is perfect to cover cakes

Adding Colour to Icing
- Icing colour comes in the form of gel. If you plan on using liquid food colouring, remember that the liquid can thin out the consistency of your buttercream icing.

- Use toothpicks to pick colour from the icing gel tub and then dip into the buttercream icing. Mix in the colour using a rubber spatula.

- If you need to add more colour, always use a new toothpick to pick the icing colour gel

I hope you found all this information helpful. I am no professional at this stuff, but all this is based on what I've read, learnt and experimented with.


And, to end this post I'd like to share a picture that I personally love the most, even with some flaws in the frosting/frosting technique.


Drool on!

September 15, 2011

Baked Coconut Bites - Modak Makeover (Egg-less)

To say Lord Ganeshji is the most adaptable would be an understatement. He's been disguised into so many avatars by us humans every year when Ganesh Chaturti comes along. Ambedkar Ganapati, Cycle Ganapati, Computer Ganapati... I mean seriously?! God really has patience with us humans for all the antics we show him.

With all that said, every year, we all serve him with the one thing that's considered his favourite food - Modak. I personally love modaks, too. I made them for Ganesh Chaturti (and forgot to click pics to post it here, but will make it for you all again soon!) and they were over in the blink of an eye even with a minor glitch in them.

But here's what happened. I ended up having extra Modak filling. Plus, like I mentioned earlier about the slight mistake I'd done - I had used shredded dry coconut instead of grated dry coconut and my filling turned out to be very dry. Still, I'd say the modaks tasted good because the jaggery/gud melted when the modaks were steamed.


So, what do you do when you have left-over Modak filling? Of course, eating it up as is can be one idea. But, how about transforming it into something else? Like these crunchy baked coconut bites?


Now, we're talking. And, you agree don't ya? These coconut-y bites are so easy to make you could even use your gooey modak filling for the same as well. Just add more flour to aid in binding. I know Ganesh Chaturti was over two weeks ago. But hey, won't you just make that filling again to eat these crunchy munchies??


September 9, 2011

Hurricane Cupcakes | Egg-less Mocha Cream Chocolate Cupcakes

Did you know a woman named her child Tsunami because he was born when the natural disaster occurred? Well, I know its personal taste, but, really?! I thought it was bordering on absurd. I mean tsunamis are dangerous, to say the least. 

But when hurricane Irene decided to spend the weekend with us not too long ago, I was thinking of things more than dangerous. With hurricane warnings all over town, packed grocery stores, no bottled/packaged water and no flashlights available anywhere, Ms. Irene sure had pressed the run-for-your-life button in all of us along the East Coast.


Now, where was I? Yes, the woman who named her child Tsunami. Well, I did something sorta similar. But, before you get ideas and think I renamed my son 'Irene' and categorize me as a maniac...listen up!

I decided to celebrate that we survived Irene. No power outage, no flooding, no evacuation orders, no broken homes around our area and to top the list we were still alive! Oh yes, go ahead and call me a chicken all you want, but, I was freaked out.

But, we really lucked it out don't you think? And, yes, the oven was still working. So why not bake? I mean you could not go out, no traffic allowed on roads, trees ripped apart, heavy winds, flood warnings and you certainly don't want to see more of the graphic hurricane representation but you do want to eat good food. That's when I whipped up these egg-less mocha cream chocolate cuppies with my friend, DS. We had a great time baking, frosting and eating 'em up.

Need more inspiration than a hurricane to bake these? Try these cupcakes and top them off with Chocolate Ganache (Recipe here), fresh cut strawberries and mint.


Before I proceed to the recipe, I'd like to let you know that this recipe originally belongs to my friend Madhuri Kumar. It's an egg-less, butterless 5 minute chocolate cake made in the microwave. I have lost count of the number of times I've made it.  Need I say more to have you enter your kitchen?


April 30, 2011

Egg-less Chocolate Pound Cake With Paneer

The end of winter makes you want to do new things. Spring rings in a new beginning. And, with this came a refreshing idea from my very close friend and co-blogger, Madhuri Kumar. She herself had been thinking about bringing in something fresh to blogosphere. Something that would bring together like-minded bloggers and get the creativity flowing in their respective kitchens. Of course it doesn't stop there. We go a step further and put across all these 'experiments', good or bad, on our respective blogs for the world to see. 

That said, she came up with a name for this group of bloggers. She christened it - Free Spirit Bloggers or FSB, for short. Yes, now you make sense of that little logo I have up on my blog. Well, the name says it all, right? Oh! Well, not quite. I'm sure you're aching to know more. Madhuri has a great write-up on Free Spirit Blogging on her site which you can take a peek at over here. Get to meet other FSB-ites and don't forget to bookmark their pages. All of them are awesome in their own ways. I am indeed honored to have been invited to be a part of such a group. Danke, Madhuri!

For those of you who want a quick piece of information right here...Be my guest. FSB is a group of eight bloggers who co-ordinate and come up with monthly themes for blogging. Something that will allow us to transcend from the mundane recipes to exciting culinary experiences. Each of us choose a theme, be it a cook, bake or something absolutely wild (in the kitchen ONLY! Ahem!) and work on it for a good 30 days before it gets presented on each of our blogs.

The whole of last month each of us were busy in the kitchen with our ovens. Why? We all decided to take up a theme based on cake baking. The month's theme was suggested by Madhuri. All of us tried different egg substitutes for a basic chocolate pound cake. I opted on trying using paneer in place of egg. You should check out what the other's used, too. Blog hop a bit over the FSB-ites pages. It's great fun.

So, in keeping with the 'spirit' I performed my experiment on one cold Spring afternoon. Here goes!


Ingredients
21/2 Cups All purpose flour (or Maida)
1 Cup Sugar
1 Cup Butter
3 heaping tbsp - Cocoa powder
1 Cup Paneer (I used paneer cubes)
1 tsp Baking Soda
1/2 Baking Powder
1 tsp Vanilla essence
1/2 Salt
3/4 Cup Milk (The original recipe for Chocolate Pound Cake calls for 1/2 Cup. I found the batter too thick and added more milk. I really think it would drink in more wet ingredients)

Method
- Preheat the oven to 350 F
- Prepare baking dish by applying butter/oil and dusting with flour till well coated and set aside
- Puree paneer in a food chopper until you have very, very minuscule pieces
- Meanwhile, sift together the flour, cocoa powder, baking powder, baking soda and salt into a large bowl
- Repeat the sifting process thrice to get a homogeneous mixture and set aside
- Cream together butter and sugar
- Add the vanilla essence, beat well and set aside
- Add the pureed  paneer to the butter-sugar mixture and beat well till it has been incorporated
- Now, add the sifted flour mixture to the butter-sugar-paneer mixture little by little and beat well till
blended smoothly
- Add adequate milk to achieve a batter of dropping consistency. Like I said, the original recipe called for 1/2 Cup. I added more to make the batter more smooth.
- Pour batter into the prepared baking pan, and bake at 180 deg C for 45-50 minutes or until a toothpick comes out clean from the center of the cake
- Cool completely before serving

Verdict
The final cake fell apart so easily that I was itching to rename this Chocolate Crumb Cake. But, I do know paneer is an egg substitute that people use. I should try this again. My suspicion is on the freshness and quality of the paneer. So, if you see another chocolate pound cake up here on SSTT soon, you know I really am working up the experimental cook in me.

March 22, 2011

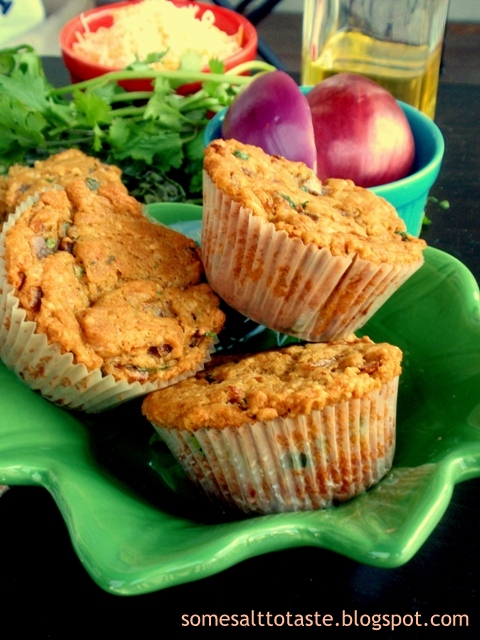
Desi Style Savory Whole Wheat Onion Cheddar Muffins

Another one of my original baking experiments that turned out great and ....I can already see the faces light up! I know I've bored you savory food lovers enough with all my cakes and sweet muffins. So, this time I've given you mirch-masala people something to drool about - and, that too, from the oven! Literally killed two birds in one shot here.


To make things better, I've added Indian spices to give these muffins a desi feel without losing out on the wonderful combination of onion and cheddar cheese.


Do you need more reason to try this one? Ok, here's one. Having this bake in your oven makes your home smell like you've made freshly baked bread. Not heard of anyone who loathes this one, eh?

March 12, 2011

Potato Mozzarella Baskets

There are moments in life when you tend to do the most ridiculously stupid things. And, as I type this post, I am doing just that. You're thinking I am out of my mind saying something so absurd? Oh, well...no, I've not yet got myself that insane. 

But, you would sure consider it insane for a person to sit at half past twelve in the wee hours of the night and start writing a post on her blog, wouldn't you? Why? She wanted to watch the clock step forward by an hour. Who? ME! Yeah, daylight saving starts tomorrow and I wanted to see when exactly this happens. My little boy and the big man of the house counted their sheep and are fast asleep in their beds and here I am having a ball watching the clock. The cable-box clock (which I'm staring at) and all those other automatic clocks in this part of the world would go one hour ahead at a certain point in time tonight... So, I hear myself croon the old Spice Girls number (with a twist in lyrics, though)...."Tonight is the night...When two become(s)...three!" Okay, I really am going bonkers out here. I should probably get to writing what I'm here for.


These little baskets get their inspiration from Nita Mehta's Mushroom and Olive Baskets, which is a recipe I found in one of her books on Baking. They're super easy and fun to entertain kids (and adults, alike). What's the best part? You can get your children to help in making this (and theory has it that they enjoy eating their food once they know they made it). I  can almost hear you saying "Oh we know 'theories' don't we? But...but...but this certainly works. My son enjoyed peeling the potatoes, placing those little coriander pieces to garnish. And yes, he gobbled these down once they were out of the oven. So, get hold of your toddler and get into the kitchen to share some fun times.

March 9, 2011

Dark Chocolate Ganache Covered Mocha Mousse Pastry

Remember my Oreo Peanut Butter Mousse Dessert that I planned to make for my cousin brother's family? Well, I ditched that whole idea. Not because it was not good, but simply because I decided to make something even more sinful. Even more drool-worthy. I mean, peanut butter is good, but chocolate is excellent! So, I traded the Oreo base for a rich chocolate cake and cut it into layers, doused it in a home-made non-alcoholic coffee liqueur and topped it off with dark chocolate ganache. Before you think it sounds so difficult, take a peek at what it looked like in the end.


This is SO worth every minute you spend making it....you will thank yourself that you tried making something on these lines. This was, quite literally, my first best chocolate cake ever. The recipe is a keeper if you think about making just a chocolate cake/cupcakes. And as for the liqueur, mousse and ganache...they just found their way into my cake and livened it up, like props for a great stage performance!

I urge you to go through the entire recipe and pick up all the ingredients before you start. You dont wnat to be half way through and realize you missed out something. No way! Also, Since this recipe is a bit long drawn I would like to break it up into parts, as below:

1 - Baking the Rich Chocolate Cake Base (Make this a day or two prior to when you want to make the pastry and store in refrigerator)
2 - Method to make non-alcoholic coffee liqueur (This and following two items, to be made on the day that you are ready to make the pastry and assemble it together)
3 - Cake assembly
4 - Method to make mocha mousse
5 - Method to make dark chocolate ganache and cover the assembled cake

Get ready for the joy ride. Just don't get bored half way through, for what you see below, is what awaits you!


Roll those sleeves up. Get in!

February 25, 2011

Sugar Glazed Banana Walnut Muffins

I hate to waste food. It is of course not something anybody would like doing. Especially when it comes to fruit, I hate to see myself throw away rotten fruit when I know I could have eaten it in the raw - What more can a lazy person ask for? No cutting, no chopping. Just wash and eat. Well, so much for natures such gifts, we always end up in situations where we have foods reaching the peak of their flavour and sometimes we just don't know what to do with the same. This happens most of the time, in our house, with bananas. We eat a couple, then they go over-ripe and then into the garbage pail. But, this slowly changed ever since I discovered the recipe for Banana Bread over a couple years ago. Not that I'd bake this every time we had over-ripe bananas, but its just such a wonderful way to use up fruit than to throw it away.


This time around I decided to twist the Banana Bread recipe to the muffin version. I even decided on adding walnuts since they perfectly compliment banana muffins. And, of course I topped it all off with a sugar glaze. One bite into this fella and you know you ain't sharing him with anybody!

November 19, 2010

Mocha Cream Gateau

Yes. I'm back. Oh no, not from my vacation. I have over two months left. But I am back on SSTT. Hmmm, I sure missed posting out here and I knew you'd be waiting to read something new, too. So, I did my bit to keep this space alive. I baked a cake the day before I left for my vacation, took pics, mailed them to myself so I could do this post someday at home. Talk about being completely obsessed!! And, you must know by now, that every cake tells a story. This one (thankfully for you!) is short. So, here goes.

My sonny boy and I left to India leaving Daddy dear behind all alone for two whole months. I felt oh-so-sad about having to travel alone. And I simply had to do something to make myself feel good as I packed my bags. At the same time I wanted to make a not so big one. Something that would make for our dessert that night and have enough slices to save for hubby to enjoy after we left. So, I came up with this mocha cream gateau. Sorry about the pathetic decoration. I made this in about three hours flat and did not have the patience to take great pictures. Shot 'em right on my counter top (You can even see my mixing bowl!!) and then we cut it and dove straight in!


With the perfect balance of chocolate and coffee giving you the right ooh's and aah's, this one's a a keeper. Make it once, and you'll agree!


October 6, 2010

Black Forest Cupcakes

What's better than good food and great company? Well, it is pretty simple - Good food, great company and LOTS of chocolate. And, what makes all this even better? Serving all this to a bunch of wide-eyed toddlers eagerly waiting at the door as you walk in with a box of freshly baked and frosted Black Forest Cupcakes. Pure joy, I say! That is precisely what I did for my little sonny S, when he moved from his playschool to prep-school early this September. I know, I know it is over a month now - How in the blue blazes did I not post it so long? Oh well, better late than never, eh?


The kids (and the class teachers) enjoyed this treat. I sure wish you would, too. Go on and make them. These gorgeous babies are only a whisk away!

September 14, 2010

Pineapple Pastry

Did'nt I just make my first Black Forest Cake like a blink ago? Yes, I did. But once it was over, I was almost intoxicated by the rich tastes and memories it left behind...and not to forget, a great learning experience. And since it turned out so good, I was waiting to try my hand the next best pastry I've ever eaten (Oh yeah, chocolate comes first...at all times!) - The Pineapple Pastry. And as if God heard my prayers it happened to be my cousin brother's 15th wedding anniversary just a week after the idea grew in my head. What better excuse does an obsessed baker need?


Making this one is pretty much on the lines of making a Black Forest Cake. Just that you need to interchange all of the Chocolate and Cherry works with everything Pineapple! That said, I am going to get a wee bit lazy and make complete use of the Copy and Paste features that we're all blessed with on our computers, so that I save a little time on typing out all the similar aspects of making these two pastries.


And just because I said I will be copying a good chunk of the procedure from the Black Forest Cake does not mean I wont  guide you at all. I will give you additional information along the way, where required, so stay awake and start reading up this humongous recipe. This is not just drool-able but VERY do-able, too!

August 12, 2010

Whole Wheat Blueberry Muffins

Summer's is slowly winding down. Although the humidity has'nt given up, if you take a hard look at the trees outside you cannot miss the random yellow or orange leaf, hushing in autumn. And that, my pal, is enough excuse for me to not turn off the oven!! When you get hooked to baking, this is what happens. All you need is an excuse. Tee hee.

Weather is just one of the umpteen number of factors (read excuses) that automatically make my hand clasp the whisk and the oven mitts. These days it's my toddler! He's begun enjoying muffins after having eaten them at his playschool. Thank God for that...and that too right in time when I bought my new muffin pan, which I inaugurated by baking a batch of Carrot Muffins. This time around I decided I will pack in a punch of anti-oxidant rich blueberries.


The very idea of feeding him something as wholesome as a muffin that's home-made, with whole wheat and fruit, every morning with a cool glass of milk or juice for his breakfast has totally captured me. And, I am sure it sounds interesting to you too, does'nt it?

Oh, and I simply had to throw in those dainty, red raspberries for the picture. They're so photogenic, I tell you...they livened up the frame almost instantly!

August 5, 2010

Black Forest Cake

While baking regular cakes and frosting them for every birthday in the family became a routine, the only stone left unturned was to try and bake the master of all things pastry - Black Forest Cake. Just the three words all by themselves have the power to get anybody into an indulgent mood. That said, this year I decided I would take the plunge and try my hand at baking this divine dessert for my hubby's birthday (psst... and mine, too, which followed!)The last two weeks saw me making frequent trips to the grocery store as I tried to put together all the ingredients needed to make this fabulous cake long before the big day. Besides, since the procedure is a bit long drawn (But it is definitely not difficult! If I can do it so can you!!) I decided to spread the whole baking and decorating process over three days. If you love eating and baking, you will enjoy every single moment of putting together this luxurious cake!

So, two days prior to the birthday, I baked the Chocolate Cake which forms the base of the entire Black Forest Cake. One day ahead, I did the layering and basic assembly of the cake using sugar syrup, cherries and whipped cream. By this time, my cake had trippled in size and it sat the lowest rack in my refrigerator and I kept my fingers crossed that hubby dear would not notice it, since it was enrobed in cream and sort of got camouflaged into the white colour in the fridge. I decided to hit the sack early that night (although excitement of finishing up the cake decoration and all sorts of ideas kept me from falling asleep for a long, long time) and as I walked towards the bedroom I did the most stupid thing I'd have ever done in my whole life. I asked hubby - "Did you open the fridge this evening?". He was like, "Umm..No. But what kind of a question is that?". He obviously thought I was insane. Then I went ahead and said, "Oh why? Can I not ask you anything like that?" Good lord!! What was I talking? He smirked.

I decided that very moment to grab him down to open the fridge. Would you believe that? I showed him the cake that sat shabbily covered in whipped cream. I simply had to do it, lest he ends up dropping something on the cake if he wanted something from the fridge while I was asleep. I had done some random design on it with my star nozzle. Sadly, even after buying everything for the cake, I forgot to pick up piping bags for the frosting of the whipped cream and the damn nozzle kept slipping inside my zip-top plastic bag as I piped. So, I did the worst frosting work ever and ended up making the cake look like a pathetic attempt to decorate a wedding cake (which you see below) and decided to wake up early the next day to really fix things up to make it look perfect. He smiled on seeing the shabby cake and said "Thank you". I was like "Ugh! Guess what cake it is, will you?" (We women never quit, do we?) He goes, "How in God's world would I know....you have bathed the whole thing  in cream!!" That had us all in peels of laughter. So, I told him I would save at least that bit for his surprise the next day. And, on my hubby's birthday I gave the cake its finishing touches and final decoration just before he woke up - all in time for the surprise!!

Here's a pic of the disastrous decoration that sat in my fridge awaiting repair work.....


The next morning I woke up about half an hour early and fixed the decoration. I placed the done-up cake on the counter. The moment he freshened up and came out of the bathroom, I beckoned him into the kitchen to see and guess what sat awaiting him!


"Oh....Black Forest, huh! That looks good!". Was I relieved or what?! Now, so much for having bored you to death with that long story. But, good food is worth long stories, right? Ok. Ok! Here's the recipe!

Oh hang on!!! Before I jump into it, just one last thing. I've split up this recipe for a three layered cake into three steps:

STEP I - Baking the Chocolate Cake Base
STEP II - Layering and Basic Assembly
STEP III - Decorating the Cake to a Finished Product

I feel I've gone back to my Technical Writing profession talking about steps and procedures as write User Manuals all over again! Well well!
So, each of these steps can be done one day at a time. Now, that's easy, is'nt it?

STEP I - Baking the Chocolate Cake Base
This step involves baking a choclate cake which acts as a base to the entire finished product. If you intend to make Chocolate cake anytime, just follow this one and you'll have a moist chocolate cake ready in no time!
Ingredients for the Chocolate Cake (Base of the Black Forest cake)
1 Cup All purpose flour (Maida)
1 Cup Confectioner's Sugar/Powdered Sugar
1 Cup Butter - Unsalted, at room temperature
3 Extra Large Eggs, at room temperature (If you are using small eggs, use 4 nos.)
3/4 tsp Baking powder
3/4 tsp Baking soda
3.5 tbsp Cocoa powder
1 tsp Vanilla essence
1/4 Cup Milk
A pinch of salt

Method
- Preheat oven to 350F and prepare baking dish by smearing oil/butter all over the insides. Dust flour to evenly cover all parts of the dish to prevent the cake from sticking to it once baked
- Cream together butter and sugar and set aside
- In a large bowl, sift together all purpose flour, baking soda, baking powder, salt and cocoa powder. Repeat the sifting process into another large bowl to make sure you have a homogenous mixture of all these dry ingredients
- Now, break eggs into another bowl and beat until fluffy/frothy (about 10-15 minutes) and doubled in quantity
- Pour the beaten eggs into the creamed sugar-butter mixture and beat again until well mixed
- Add the vanilla essense to this wet mixture
- Slowly pour and fold in small quantities of this wet mixture into the dry ingredients using a flat spatula, as you combine it all together to form a smooth batter.
- This batter may be thick, so pour in the milk gradually until such a point where you are easily able to maneuver your spatula in the same and batter is all creamy and dreamy
- Pour the batter into the prepared baking dish (I have used a 9" round dish) and bake for about 30-40 minutes or until a toothpick comes out clean when pierced in the center of the cake
- Once baked transfer the cake onto a cooling rack to allow the cake to come down to room temperature

If you intend continuing to STEP II, make sure the cake is completely cooled. But if you want to go to STEP II the next day, go ahead and place the cooled cake in the refrigerator overnight.

STEP II - Layering and Basic Assembly

This step involves cutting the cake into layers, dousing them in sugar syrup and topping them off with whipped cream and chopped cherries. Sound's easy breezy, does'nt it? Go right ahead and do it!
Take your cake out of the fridge and place it on your contertop until you grab the ingredients required to layer and frost it. This will allow the cake to come back to a warmer temperature before you flip it over your cake board/plate (The one on which you intend cutting it in the end). Now, get hold of all the following things from around your kitchen/pantry.

Ingredients
4 Cups - Whipped Cream/Topping (I used store bought ready-made whipped cream to save me some time. If you intend making it from scratch, go right ahead. Just whip together, in a chilled bowl,  3.5 Cups of heavy whipping cream along with 1/2 Cup (or more if needed) of Confectioner's sugar  until it forms soft peaks)
1 Bottle of Maraschino cherries (without stems) in syrup
3/4 Cup Water
3/4 Cup Granulated Sugar (Regular sugar)

Method
- In a saucepan, combine the water and granulated sugar and set to a boil
- Once the sugar melts, turn off the heat and set aside to cool
- Now, head back to your cake and flip it over your cake board/plate. If you feel the cake is giving you a hard time flipping over (and if you have used a microwave safe dish to bake it) then toss the cake, prior to struggling to get it out of the baking dish, into the microwave for about 15-30 seconds. This will warm up the cake and allow for it to be easily lifted off (by slowly tugging at the sides using a broad off-set spatula) and flipped over onto your cake board. Yet, be careful as you do this so that you dont end up with a broken cake!
- If your cake seems to wobble, turn it back onto original position and smooth away any bulging parts (using the serrated/ridged knife) and flip again onto your cake board so you have a sturdy base to work with. You could place a paper towel below your work area for all the (yummy) mess that follows
- Using a serrated/ridged knife cut the cake into two slices horizontally to form a three layered cake. Remove layers and set aside. Remember in which order and direction you have placed them, lest you end up placing them back in the opposite/wrong way leading to an odd shaped cake after its all done!
- Separate the cherries (I used only 3/4th of a 16oz./1lb bottle) from the syrup. Do NOT discard the syrup. Keep aside in a bowl.
- Chop cherries randomly into small pieces and set aside in another bowl
- (Optional step) Now, take about 5 tbsp of the cherry syrup and mix it with the cooled down sugar syrup to give the cake some extra cherry flavouring.
- At this point you should have one layer (the lowest one for the final cake) on your cake board. If not, place it on the same and mount it on your turn-table (Or put together a make-shift turn-table like I do - I just flip a large steel plate to place the cake, and then I mount this on my round chapati rolling stand. You can see it in one of the images below. Works just perfectly!)
- Lightly drizzle about 1/3rd of the quantity of the sugar syrup (or sugar-cherry syrup if you've included the previous step) over this layer of the cake, covering the entire surface area. This step is what gives the final cake that super moist texture!
- Now, scoop about 1 Cup of the whipped cream and drop the humongous dollop onto the lowest layer using a frosting spatula
- Spread all over the layer covering it completely such that you have a thick layer of whipped cream on it. Add more cream if you think your cream layer is not too thick since this is dependant on what size of a baking dish you used/size of your cake. A 1/2 to 3/4th inch thick layers of cream seem fine to me, but indulge if you like more!
- Now, sprinkle the chopped cherries over this cream layer. Your done-up layer should look similar to the image below

- Place the middle layer on top of this. Smooth out any cream that seems to be seeping out between the layers and place in the fridge for about 20-30 minutes to set
- Pull out and mount the cake back on the turn-table. Repeat spplication of the the sugar/sugar-cherry syrup, topped up with the whipped cream and cherries to this layer and place the top-most/final layer
- To this top-most layer just drizzle the sugar/sugar-cherry syrup
- Now, using the frosting spatula drop about 1/2 to 3/4th cup of whipped cream and frost the entire cake. Your cake should look somewhat similar to the image below


- Don't worry too much if its not a very smooth coating all over since you can fix that in the next step
For now, place this frosted cake in the refrigerator overnight to allow all the flavours to marry, and try to get a good night's rest for the big day: The day you'd finish decorating and cutting and most importantly EATING the cake!

STEP III - Decorating the Cake to a Finished Product
This step involved coating the cake with a smooth layer of whipped cream and topping it up with all that you desire. Yup, yup! We're almost done and I am SO proud that you've read this far. Keep going...your divine dessert awaits you at the end of all this.

Ingredients
Left over whipped cream (You should have about 1.5 Cups left since we used only 2.5 cups before this)
4 oz bar of Semi-sweet Chocolate (I used Hersheys)
2-3 tbsp Chocolate syrup (I used Hersheys, again. I should probably rename this cake to Hersheys Black Forest cake, eh?)
A handful of Maraschino cherries, drained completely (You can use stemmed ones here if you wish)

Method
- Chop the chocolate into slivers/shavings using a sharp, ridged knife and set aside in a bowl/box back in the fridge, so as to avoid melting
- Take small dollops of whipped cream and apply a layer of cream over the sides of the cake as you simultanuously rotate your turntable. Use smooth back and forth motions to cover the entire cake (sides) evenly. Dont worry too much about tiny peaks and valleys. We'll work on them in a few steps.
- Drop about 1/2 Cup of whipped cream on top of the cake and spread out evenly using a flat spatula
- Run your spatula against the top edge to remove any excess cream between the sides and the top of the cake
- Now dip a steel frosting spatula, in hot water, wipe with a towel and spread out any uneven parts of the frosted cake as you rotate the turntable, to get a smooth finished look
- Using a wide spatula, dab on the slivered chocolate on to the sides of the cake. I hope you still have that paper under your turntable. Don't tell me that I did not caution you against this yummy mess!!
- Be careful while doing this so that you dont lose out on the smooth finish of the cake. You can still see some flaws in mine! I really have to work on frosting cakes!!
- Place cherries one inch apart on the edge of the top of the cake
- Now, pipe dollops of whipped cream between each cherry
- Drizzle the chocolate syrup in a zig zag pattern and voila!

WAIT, WAIT, WAIT!!! Pop the cake in your fridge for a couple more hours to set it. Take it out just about 20-30 minutes prior to cake cutting/serving time. I like it that way 'cuz it gets the juices flowing as the cake comes to room temperature. But, if you like it really chilled, go ahead and dig in.


You still here? Ok, nice! Now, cut up a slice of your Black Forest Cake (Ah! finally we get to call it that!) and thank the creator of this world to have given humanity the capability to create something this fabulous. As for me, I am off to sing the popular hindi song - "Tera mujhse hain pehle ka naata koi, yuhin nahi dil lubhata koi" (You share a long-lost bond with me...How else would somebody seem so dear to my heart?!)  to the last slice of my Black Forest Cake!

Makes 12 slices of pure joy!

I'm sending this one to Madhuri's Chocolate Fest  as she celebrates the first anniversary of her blog, Cook-curry Nook.

July 20, 2010

Super-soft Low-fat Eggless Whole Wheat Carrot Muffins

Over time, baking (to me) has become both an obsession and therapy. I bake when I am happy. I bake when I am sad. And, sometimes (almost all the time, really) there needs to be no excuse for me to bake. Just the joy of having the wafts of something miraculous happening in my oven gives me a high that I would think no drink could! But, this time around I did have an excuse to bake. I bought a new muffin pan (and why do I feel like a kid confessing he/she secretly bought a new toy? Haha!). Just as you guessed, it did not end at that. I had to use it the very same day...and that's exactly what I did.

Posted by Picasa
These muffins to me are very special. (Bahahaha! I know you're like say something new..who does'nt like muffins?!) Well, I have a solid reason this time around. I've always wanted to master baking. I know I am still thousands of miles away from it, but I sure want to get there - and what a delicious run it is indeed! After I started blogging and associating with so many people who really push the limits to how much you can do, my food-adventurous-side really got all fired up! Everytime I baked (until yesterday), I would take a look at some recipe online at least to make sure I knew my measurements right. But, these muffins happen to be my very FIRST experiment with baking where I have not taken a single peek at anything - online or otherwise. I had my heart in my hand as the oven did its work, and boy, was I happy at the end of it all!!


Now, with all that said, I would be a really stupid person if I do not give credit to Madhuri for having introduced me to just how delicious baked goods can be without eggs. Thanks babe! In this recipe, I've used flax seeds to replace eggs. I still remember discussing the goodness of these seeds with another friend of mine who suggested I could even add them to making chapathis etc. My instant response was, "Chapathis? No WAY! I do not want to waste them like that when you can bake with them!" *devilish grin*. And if you've been an avid follower of SSTT you'd have noticed the Microwave Chocolate Cake (Thanks to Madhuri, all over again!) I had mentioned that I was going to experiment on it. I did just that. I traded the all-purpose flour for whole wheat to keep things as healthy as I could. Also, this time I did not use the microwave and the results with the regular oven, as you can see, were fantastic, too!


I bought the muffin pan yesterday, baked these yesterday, clicked the pics today and posted it out here too! That should tell you just how excited I am about baking. LOL! Okay, let me stop jabbering and give you the recipe, NOW!

Ingredients

3/4 cup Whole Wheat flour
3/4 cup brown sugar (tightly packed)
A pinch of Salt
3/4 tsp baking powder
1/4 tsp baking soda
1 tsp Vanilla extract
3 tsp roasted and fine-ground flax seeds mixed in 1/2 cup warm water (Or two eggs. If you opt to use eggs increase the quantity of the whole wheat flour by a fourth of a cup i.e. 1 cup)
Between 1/3 - 1/2 cup Whole Milk
Between 1/3 - 1/2 cup Cooking Oil (I've used Sunflower)
1/2 Cup grated carrots

Method
- Preheat oven to 350F
- Spray/Oil muffin pan and set aside
- Sift the whole wheat flour into a large bowl
- Add brown sugar, salt, baking powder and baking soda and stir well
- Toss in the vanilla extract, oil and whole milk and mix well. This batter will be very thick
- Now, give a slight stir to the flax seeds in the warm water and add them to this batter
- Add grated carrots
- Whisk for about 5 minutes
- Line prepared muffin pan with paper baking cups and pour batter into each, upto about 3/4th of the cup. (I have used a pan that has a 1 3/4 inch (4.5cm) base diameter)
- Bake for about 30 minutes or until a toothpick comes off clean out of the center of a muffin
- Cool completely and serve

Makes 12 'I-want-one-NOW' muffins.

Go ahead and bake them in dozens...then stock 'em up in your fridge. Warm them up for a couple seconds in the morning and you will no excuse to skip breakfast ever again!

July 12, 2010

Nan Kathai

If you have been wondering why there is so much silence on SSTT, its simply because I've been too busy. Too busy - enjoying myself this summer! We're planning trips and heading outdoors almost every weekend and making sure we stock up on loads of snacks to-go. That being said, one fine day I decided I had to dish up something all by myself. Something that we could throw into a zip-top bag and take it with us to munch as we rolled down the highway. And, right then I remembered this crunchy little, long forgotten (in my case) Indian cookie - Nan Kathai. Of course I did not know how to put it together...but why do we have the internet?! I remember having come across this one on Manjula's Kitchen - A site that I refer a lot of times when I want to 'see' how to make stuff rather than just read. You should look it up. She has some great videos wherein she explains recipes with utmost patience and makes it all seem like a breeze!


Ingredients
1/3 cup all purpose flour (maida)

1/3 cup fine semolina/rava/sooji
1/2 cup gram flour (besan)
1/2 cup unsalted butter at room temperature

2/3 cup sugar

A pinch of baking soda
1/4 tsp green cardamom seed coarsely powder (Elaichi powder)
2 tbsp Mixture of finely sliced almonds and pistachios

Method
- Pre heat the oven to 375 degree.

- In a large bowl, cream together butter and sugar until completely blended. I cannot resist myself from eating a glob of this! Horrible, I am, eh?!
- In another bowl, mix the all-purpose flour, semolina, gram flour, baking soda and cardamom powder and set aside
- Add this to the butter and sugar mixture and knead together to make soft, smooth dough
- Make small, equal sized balls of the dough (about 1 inch in diameter)
- Press each ball between your palms to form the shape of a thick cookie and place on a greased cookie/baking sheet
- Dab each nan kathai cookie with a pinch of the almonds and pistachios
- Place nan kathais in the pre-heated oven and bake for about 20 minutes or until nan khatais are lightly gold brown
- Allow nan kathais to cool down completely before taking off cookie/baking sheet

Makes about 20 light, crunchy nan kathai - Perfect for tea-time, travel-time or just about any time!!

May 21, 2010

Madhuri's Microwave Chocolate Cake And A Li'l Gift For Her!

I have been having this on my mind for a long time now. I just did not find a good chunk of time to sit down and do this post at one go. So, I split it up in bits and saved pictures and drafts along the way.. and today, finally I hit 'Publish Post'! Yes, Madhuri, this one is (again) for you. Those of you who don't already know , Madhuri and I were school mates and have now connected through online networking and most recently through food blogging. If you have'nt already taken a peek into her space, do so @ Cook-curry Nook.

Although my blog happens to be couple months older (half a year I guess!)than hers, I must admit her repertoire of recipes is way more exhaustive and delicious than what I have stocked up. Her pictures speak for themselves and make you want to immediately get your hands on the ingredients and try out what she has put up. So, one such recipe that had me at the first look was her uber-decadent Eggless,butterless 5-minute Microwave Chocolate Cake. I simply HAD to try it. And, that I sure did.

But before we dive into the tried and tested recipe, I have a little something to share. These days if there is anyone's blog that I look up for recipes, it is Madhuri's. I love how she explains things out, making cooking seem like a very enjoyable task...especially for a person like me, who would run out of the kitchen given a chance! So, I designed this ...um, let's call it a badge, shall we? Yeah, I designed this JnJ Inspirational Blogger Badge for her, to let her know she does so in every way. JnJ?? No, that's not a typo! Read on - Yes Madhuri, you inspire me with your cooking pretty much the way Julie Powell was by Julia Child to try out all of her recipes. So here you go..this one is for you - The Julie & Julia Inspirational Blogger Badge!!


Madhuri, you could share this with anyone you think inspires you in a similar way - or better yet, just keep it!! :D

Now, for the ultimate, super-quick, super-yummmmmmy cake recipe. I downsized it a bit and made some adjustments, which I've written down to guide you through the recipe. The major change of course was that I added Chocolate syrup instead of Cocoa powder which made my cake very gooey and fudge-like in the end. I like cakes that way so it was fine. But, if you like your cakes a wee bit dry then go for the cocoa powder (Psst...I tried that version too. Just goes to prove how much I love chocolate cake, does'nt it?)


Ingredients
1 1/4 Cups All purpose flour/Maida
4-5tbsp Hersheys Cocoa Syrup (OR 1/3 Cup Cocoa powder)
1 1/4 Cup Brown Sugar, firmly packed
3/4th tsp Baking Powder
1/3rd tsp Baking Soda
1.5 tsp Vanilla essence
3 tsp Flax seed powder mixed in 3/4 cup warm water (substituting 3 eggs)
1/3 Cup Milk(I used whole milk)
1/3 Cup Oil (I used Corn Oil)
A pinch of salt

Method
- Sift the flour into a large preparation bowl
- Add the brown sugar, baking powder, baking soda and salt and mix
- Stir in the milk, oil and vanilla essence to make a smooth batter making sure there are no lumps
- Add the chocolate syrup and blend with your spatula
- Pour the flax seed powder mixed in warm water and mix well to make a silky textured cake batter
- Taste the batter to see if it is 'chocolatey' enough. If not add more syrup/cocoa powder
- Pour the batter into a microwave safe glass bowl. Madhuri suggests using a wide bowl, which is what I did
- Cover with cling wrap and make slits in the wrap to allow steam to escape
- Cook on high for about 8 minutes. Check and add more time if you feel the cake needs more cooking
- Once done, remove the cling wrap and allow it to rest up a tad bit - around 10 minutes.
- Insert a toothpick in the center of the cake to check if it is done. You could opt to check in another couple of spots too, since unlike the traditional/conventional oven, microwave heat (I think) does not spread very evenly.
- Let cool a few more minutes. Cut up into slices and decorate with your choice of toppings. I have used confectioner's sugar, clementine slices and dried blueberries.
- Serve warm (That's how I had mine)

This Makes about 12-15 thick, delicious slices of chocolate cake!


One helluva recipe I tell ya. I can see myself make it so very often! Danke, Madhuri...so so much! I just might try experimenting with it too, so watch out for this space.

Oh and yes, for those of you who loved the badge, go ahead - pick it up and share it with those who you think deserve it. Spread the inspiration!

April 28, 2010

Soft Sour Cream Cookies

If you have been following my posts lately, you'd have noticed the Sour Cream And Veggie Dip. Needless to say, I had sour cream left after I prepared this. I wanted to make something different and I could sense the baking ghost haunt me. And much to my interest, one of Food Network's popular chefs made these unique Southern American style of cookies. Not South American, but the southern reagion of the USA is where she hails from. From the past few years of my watching her shows, I've learnt that they have a lot of country style recipes that she shares. I thought I will try my hand at these...and share them with you. They turned out great...and if there was one thing that really intrigued me it was how the cookie would taste once baked. Would it be sour? Would it be sweet? Who knew! I simply baked! Much to my surprise, my little one who normally does not like sweet goodies, enjoyed this one. So, I can assure you it will be a hit with your kids. Go ahead and try it out...

Ingredients
1.5 Cups All purpose flour/Maida
1/3 Cup Sour Cream
1/2 Cup Confectioners Sugar
1/3 Cup Unsalted Butter, at room temperature
1 Egg, lightly beaten
3/4 tsp Baking Powder
1/4 tsp Salt

Method
- Preheat oven to 350F
- Cream together sugar, butter and the egg until fluffy
- Add sour cream, flour, baking powder and salt
- Mix thoroughly to make soft, pliable cookie dough
- Pull out small portions of the dough and make balls of about 1/2 inch in diameter
- Press slightly with the palm of your hands to flatten
- Place on greased cookie sheet and sprinkle sugar on top of cookies before baking
- Bake for about 12 minutes at 350 degrees. Do not overbake as these are supposed to be soft and not browned. Apparently, the cookies will turn out to be hard if overbaked - So keep an eye!

Makes 2 dozen soft cookies

March 12, 2010

Muesli Topped Blondies Drizzled With Chocolate & Hazelnut Syrup

I hate junk mail. Yes, I HATE the very fact that people waste paper in the name of marketing and it collects in my letter-box every week. But nonetheless, I have to sit and sort out all the leaflets, brochures, pamphlets, mailers and letters that gather consistently over time. It is hard to do so without noticing what each of it says, lest I toss something useful onto the paper-shredder. It was during one such rampage that my eyes fell on this recipe. Yeah, and you were beginning to wonder if I have lost my mind...writing about junk mail on a food blog. No, not yet! At least, not when it comes to baked goods.

So, where was I? Yup, the recipe. It held my gaze for a long moment and the very next instant (no prizes for guessing) I knew I was going to bake it. "Sweet Treat - World's Best Blondies...and Simplest, too" - the title read. I love brownies, but I had never really heard of blondies. After I did my bit of online research I learnt that they are just like brownies, except that they are flavoured using brown sugar instead of chocolate. Splendid, indeed! But I had no chocolate OR brown sugar on hand..and still wanted to try these so bad. So, I went ahead and experimented using confectioners sugar and the outcome is what you see below. Hmmm..perhaps, I should have called them 'Whities'? I will let you decide.

The original recipe calls for adding dark chocolate chips and M&Ms. I altered it a wee bit and topped these babies with toasted muesli and drizzled chocolate and hazelnut syrup.


Ingredients
1 Cup All purpose flour (Maida)
1 Cup Confectioners sugar
1 Egg, lightly beaten
1/2 Cup unsalted butter at room temperature
1/2 tsp Vanilla Essence
3/4 tsp Baking powder
1-2 tsp Milk (if required)
1/2 Cup Muesli (or just a mixture of rolled oats and nuts)
2 tbsp chocolate syrup (I used Hersheys)
1 tbsp Hazelnut spread
A pinch of salt

Method
- Toast the muesli for about a minute on a low flame and set aside
- Preheat oven to 350F and prepare an oven-safe baking dish with non-stick spray/oil
- Melt the butter in a non-stick sauce pan pour into a large mixing bowl
- Add sugar to this and stir
- Toss in the lightly beaten egg and vanilla extract and whisk
- Add the flour, baking powder and salt to the above wet mixture and mix to a smooth texture
- Pour the batter into the prepared baking dish, sprinkle the toasted muesli evenly over it and place in preheated oven
- Bake for about 20-25 minutes or until a toothpick comes out clean
- Allow to cool and cut into 1 inch squares
- Before removing from the baking dish, spoon the chocolate syrup and hazelnut spread into individual zip-top bags and push the contents in each bag to one corner to remove any air bubbles
- Snap a tiny portion (just a very small hole) of the same corner and pipe the syrup and sauce in alternative lines (or get creative and do your thing!)
- Enjoy!


Makes about 40 decadent mini cake-like blondies.

TIP - Add more butter if you want to render a gooey, fudge like texture to your blondies